A sample text widget
Etiam pulvinar consectetur dolor sed malesuada. Ut convallis
euismod dolor nec pretium. Nunc ut tristique massa.
Nam sodales mi vitae dolor ullamcorper et vulputate enim accumsan.
Morbi orci magna, tincidunt vitae molestie nec, molestie at mi. Nulla nulla lorem,
suscipit in posuere in, interdum non magna.
|
Coming down Nob Hill my friend took his Porsche airborne at Powell, turned to me and grinned.
‘Is that what you meant?’ He downshifted in front of the hotel, hooked a U-ey and screeched to a halt at the curb. The women unfolded themselves from the tiny backseat, straightened their hair, and cursed our recklessness as two bellhops ushered us through the big brass doors. Moments later we were back at the car, primped and ready.
 This is the way to feel like a real Californian ‘The Mission District, and step on it,’ I said. And we were off again, barreling through the streets of San Francisco, just a little late for our evening at Delfina.
What’s up with Tommaso’s? If we had any qualms about leaving our kids behind that weekend, they were put to rest in the first hour. Under a glorious blue sky, the Salad Queen and I walked up to North Beach, found a table in the sun and slipped into the blissful state that defines our relationship. A piece of veggie quiche, a glass of Prosecco and thou, my dear. Alas, it lasted only a short time and then we both got itchy. After all, there was a city out there to explore.
Six miles of walking later, with many San Francisco hotspots bagged and under our belts, we landed at Tommaso’s, the oldest pizza joint on the west coast, opened by a guy named Frankie Cantelupo in 1935. This was a place that came highly recommended from several quarters. The brick oven was fabulous; a thing of wonder to a wood-fired fanatic, and the atmosphere was bustling. Avoiding the long central table which runs the length of the dining room, however, proved to be more challenging. After fits and starts we were moved to one of the white-painted booths off to the sides.
I’d like to tell you Tommaso’s was worth it. But in a food-centric city like San Francisco, which boasts more restaurants per capita than any other U.S. city, the place was just so-so. Maybe it was an off night. The pizza was less than stellar, with a too-thick center and a rolled edge. The special potato pizza was dry and lacked a certain dimension of flavor. What saved our meal was their bog-standard cheese pizza dressed up with a topping of spinach and shaved Parmesan along with a memorable 2007 Napa Valley Sangiovese from Del Dotto Caves. The thing that really rankles is we left most of the potato pizza untouched, and nobody even came to ask why. Shame on you, Tommaso’s!
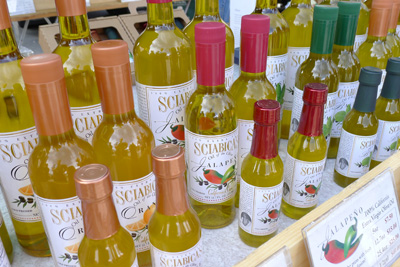 Sciabica's Olive Oil at the market behind the Ferry Building A bagful of goodies: At Café de la Presse, a stone’s throw from the French Consulate, I had an excellent Oeufs Meunier the next morning – poached eggs with wild mushrooms in a red wine reduction – but it was all a mistake. Bellies full, we trundled our way down to what turned out to be the grazing event of the weekend, the Saturday market down on the waterfront at the Ferry Building. Ooh la la!
If we’d had it all to do again, we would have surely saved ourselves for the market. Some pig bits at Boccalone? Wild mushrooms at Far West Funghi? Olive oil from Sciabica’s? Fresh produce from Heirloom Organic Farms? A little of this, a little of that was the way to go here. The least we could do was to have a scrumptious pastry and a coffee from Frog Hollow Farm, whose line was 30-deep with everyone smiling as they walked away. Instead, I latched onto a lovely Levain Bread from Acme Bakery, and thrust it into my daypack for another day.
The next day we breakfasted on omelets at our favorite faux 50’s diner near Union Square before heading to the Haight, but this time we made the right call. Lori’s is all decked out in chrome and formica and greaser-era memorabilia. Want a booth? No problem: there are tons of them. Dine in your car? Well, not quite, but there’s an old Edsel in the joint that’s set up with a tailgate table. Over in the Haight Ashbury district the yearly street fair looked like another foodie event but upon closer inspection it proved to be a lot of fast food decked out in tie dye. While the throngs of people were spectacular, it was a good thing we’d eaten elsewhere as the food was marginal. We did end up with some totally awesome tee shirts; it was the Haight, after all!
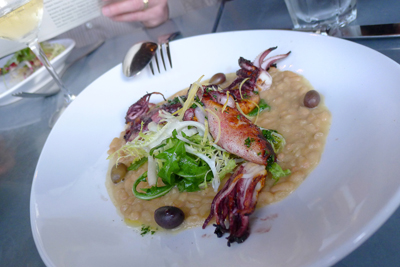 Woodfired calamari on rice beans at Delfina Delightful Delfina: There were so many things right about our dinner at Delfina, from the moment we pulled to the curb and were shown to a table in the window with nary a wait. All evenings should go so well. The food was good, the waitstaff was knowledgeable and the service was impeccable. Sharing it all with great friends made the moment precious. And Delfina made it all happen in a delightfully casual way.
What makes Delfina stand out from the crowd is its depth. My admittedly non-foodie friends could just order and be happy with the results. But once the Salad Queen and I scratched beneath the surface, a whole world opened up. The beans under the calamari weren’t just beans, they were rice beans from Rancho Gordo. The chicken wasn’t just any old chicken; it was young Fulton Valley chicken, and the waitress could probably find out what breed it was if she didn’t know already. The bread on the table came from down the street at Tartine. In fact, every item on Delfina’s menu told its own story if you cared to ask the right question.
Next time we’re in San Francisco, we’ll be sure to go back.
Beyond the food scene: Climb the Coit Tower. Ride a streetcar to Ghirardelli Square. Bike to the Golden Gate Bridge. Shop at the craft stalls set up near the Ferry Building. Take in Alcatraz. And get out to Tiburon if you can. It’s not much of a foodie event, but it’s a great place to go with friends. Especially in a sports car… we’re talking California, after all!
 The Salad Queen biking to San Francisco's Golden Gate Bridge
The sun-drenched pink walls in the central court at Mesones Sacristía were too much for my early morning eyes. We ducked from the brightness into a quiet room to one side and slipped into a fug of half-sleep, slaking the cotton of jetlag with coffee. Maurice raised an eyebrow at the sunglasses I’d donned against the glare and held his pencil ready.
 The central dining room at La Compañía in the hotel ‘Huevos Rancheros? Si, senor. Un momento por favor.’
As we’d been quick to discover, Puebla’s crisp clear air, centuries-old culture and hip and happening feel more than made up for any lack of beaches in the vicinity. Wandering the European-style districts of this city set in mountains between Mexico City and Veracruz, we nibbled on street food and dined with Mexican tourists in the square. But this day was different: now it was time to learn.
From a little kitchen behind the hotel’s main desk, Chef Alonzo Hernandez and his friendly assistant Liz taught us over three days more than I ever expected to know: about chilies, cooking techniques, and the sauces and spices of Mexico. Soft-spoken Chef Alonzo, casually capable and precise, was more than up to the task. Considered one of 3 or 4 top chefs in this food-centric city, he brought to the table his unerring culinary wisdom. He and Liz changed our minds forever about Mexican foods.
After those classes, I can never again look at a chili pepper the same way. How it’s dried or smoked matters so much that the same pepper can end up with many different flavors. And then in cooking, whether a chili is dry-fried on a comal, fried in oil in a pan or reconstituted with hot water gives another dimension as well. And how dark a chili’s allowed to get when first dried or later cooked determines its intensity in the final sauce. One sauce made in his restaurant utilized a special pepper that was slowly dried until medium-brown and then treated with liquid smoke to impart its characteristic flavor. As far as Chef Alonzo and Liz knew, there was no other chili and no other sauce like it anywhere.
Meanwhile, my favorite breakfast arrived with a slight smile from Maurice. The vivid spicing on the eggs perked up my taste buds. The dish’s main event was another of the great sauces that came from Chef Alonzo’s kitchen, perfectly balanced. ¡Buen provecho! Here’s my take on it.
;
Huevos Rancheros the Puebla way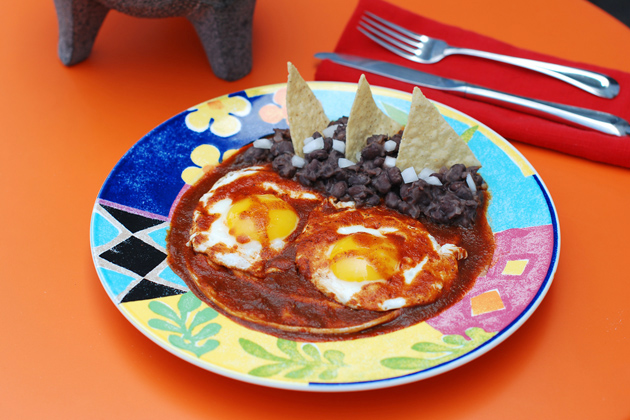
Makes 2 cups of sauce, enough for 4 servings
For the sauce:
8 roma tomatoes, about 1½ pounds, cut in half lengthwise
1 Ancho chili pepper, stemmed and seeded
1 Chipotle chili pepper, left whole
¼ of a large white onion
1 large clove garlic
¾ teaspoon salt
1¼ cups of hot water
For each portion:
2 lightly fried white corn tortillas
½ cup of sauce
2 eggs fried as desired
Refried beans and tortilla chips to garnish
Cooking note: The authentic way to cook the ingredients for this sauce is by dry frying them on a comal, which is a flat piece of 16-gauge steel with raised edges and a little handle. Very simple, but it works. Alternately, use an uncoated metal frying pan, but resist the urge to add oil. Also, do not use a Teflon-coated pan for this step as it is unsuitable for this type of cooking.
 Cooking tomatoes on a Comal Dry fry the sauce ingredients: Cut 8 roma tomatoes in half lengthwise; cut ¼ of a large white onion crosswise in half and separate the segments; peel a large clove of garlic and cut into two pieces; and remove the stem and seeds from a large Ancho chili and tear it into four flat pieces.
In two batches, dry fry these and the chipotle chili over medium high heat on a comal, turning the pieces often with tongs to lightly char all sides. I find it easiest to cook half the tomatoes and all of the other ingredients at once, when the comal needs the most attention, and do the rest of the tomatoes second. As various pieces become limp and cooked through, remove them to a bowl. (The ancho chili will cook fastest, and then the garlic, onion and chipotle chili, while the tomato will take as long as 10 minutes.)
Make the sauce: Put the finished pieces in a blender or food processor, add ¾ teaspoon of salt and 1 cup of the water, and pulse until smooth. Add the other quarter cup of water if the sauce is too thick – this depends on the juiciness of the tomatoes. Now liquidize for about 30 seconds.
Put the sauce through a fine sieve to remove seeds and skins. You should end up with about 2 cups of thin sauce and 1 cup of discarded pulp.
Arrange the plate(s): Lightly fry 2 tortillas per serving. Heat refried beans in a small pan. Fry two eggs per serving, preferably sunny side up in the Poblano way. Spread 3/8 cup of sauce under and around the tortillas and put the eggs on top. Spread a couple of tablespoons of sauce over the eggs. Garnish with refried beans and tortilla chips and serve hot.
To see photos of the cooking classes we took in the beautiful city of Puebla, click Here. And if you’re interested in taking your own cooking classes, contact Liz at Mesones Sacristía and she’ll be happy to make arrangements. Just be sure to tell her Sortachef sent you!
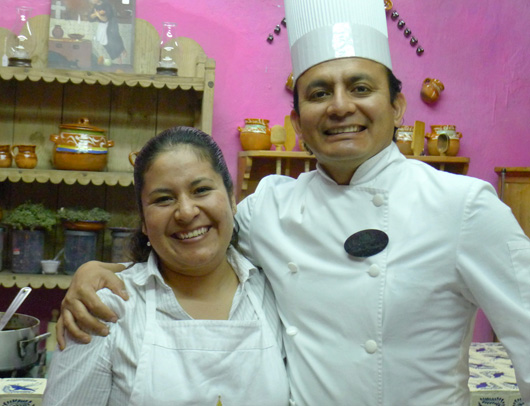 Liz with Chef Alonzo in the classroom kitchen at Mesones Sacristia
The sun shone with searing intensity on the outside seating area at Jerome Bettis Grille 36. Brightly clad baseball fans made their weekly pilgrimage to an afternoon game and, while I would’ve killed for a good beach umbrella right about then, I watched them stream past incongruously carrying brooms. Brooms but no umbrellas; go figure!
 Brothers Max and Herb work the kitchen at Enrico's in the Strip District The hostess said they gave up on umbrellas because the wind that rushes up the valley always knocks them down. As I sweltered on the edge of a hot table waiting for my friends to arrive, I looked out across the broad Allegheny to the majestic crown of Pittsburgh’s skyline, and decided I could stand a little heat. Whatever the patio at Jerome Bettis 36 lacked in sun protection it certainly made up for with its awesome view.
On my sixth mouthful of papaya salad at Nicky’s Thai Kitchen, I felt a different kind of heat creeping up on me. Even though this was a pleasant heat, the kind that stayed in the mouth and didn’t spread to lips or gullet, it was unusual in a salad. And refreshing, I decided. In fact, from the pleasant greeting I got at the door and the casual competence of the waitstaff, right on to the fresh flower arrangement at the table and the soothing sound of water in the room, everything about this little restaurant on Pittsburgh’s north shore refreshed me. I took a swig of water and watched the couple at a nearby table coo at their newborn.
The Wine Fairy complained to me about the heat at Enrico’s. She poured a taste of the local label’s Syrah and left me to sample the heady mixture while she stepped outside to get some air. I turned toward the inside and beheld a most wondrous sight: right there in this little cafe in the Strip District out to the east end of Pittsburgh a brick oven was fully stoked and a gnarly headed guy was baking up lovely little Italian-style pizzas. This was my kind of place. I put down my glass and went down for a closer look.
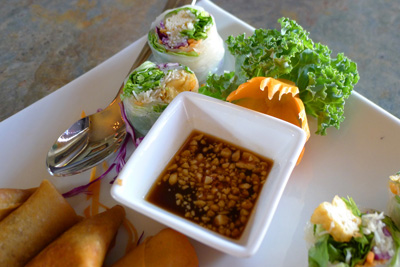 Noshing at Nicky's on Pittsburgh's North Shore All of these places are sizzling in more ways than one. Jerome Bettis Grille 36, which fills a vacuum in this most sports-minded of cities, is an antidote to downtown Pittsburgh’s tight claustrophobic feel. Walk across the bridge, meet a couple of friends you haven’t seen in a while and that feeling dissipates. Nicky’s Thai Kitchen is a breath of fresh air in a city whose claim to culinary fame has long been a sandwich that has the fries on the inside. Nicky’s is quietly serving up innovative curries like Salmon Mango and Massaman in a neighborhood near the National Aviary that’s poised for transition. The most astonishing thing about Nicky’s is that there was no line waiting to get in. Before it’s discovered, go!
You’ll be forgiven for wandering into Enrico’s Biscotti storefront and missing the cafe out back. I know that’s what I almost did. Stacked like Jenga towers, the biscotti was beguiling, with flavors galore. But go around the corner and you’ll find a whole other world.
Enrico’s Biscotti Cafe is active and ambitious, doing several things in a fairly small space. There’s the wine thing, with tastings at the front and several bottles to choose from, all made locally with juice from California, Chile and Italy. There’s the biscotti thing, the baking and cutting of which takes up more than half the kitchen back here. And then there’s the restaurant thing, with woodfired pizzas, sandwiches and specialties. Be sure to look into one of their First Friday Dinners, which showcase the oven, or to take in the Italian Bread Baking demo.
Now, if there’s a commonality among these restaurants besides how hot they are, it’s that in every place there’s something I failed to do. I didn’t have a pizza at Enrico’s. I noshed on spring rolls and samosas with my huge salad instead of trying one of the fabulous-looking entrees on the Chef’s Special list at Nicky’s. And I didn’t even come close to ordering the deep-fried Italian hoagie at Jerome Bettis.
I also didn’t give the Six Penn Kitchen in downtown Pittsburgh enough attention. While I had an excellent lunch there, I barely noticed it, so busy was I meeting old friends who I hadn’t seen in years. My bad. It’s a cool place. Well, there’s only one way to remedy a thing like that. I’ll just have to go back!
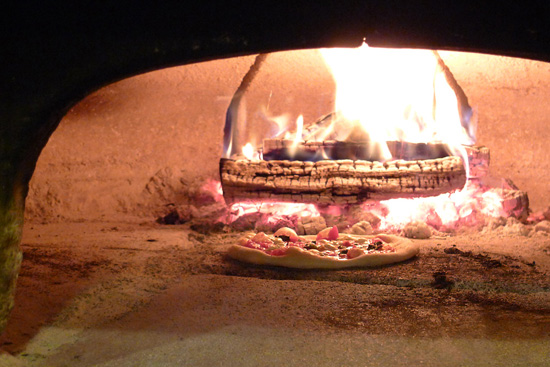 Margherita Pizza in the oven at Enrico's in Pittsburgh's Strip District
Some years ago, my wife and I shared a perfect mango in the south of France. We peeled its leathery skin with a pocket knife and sliced into peach-like flesh. As we gobbled strips of the heady fruit a crowd of dark-eyed children formed around us, giggling at the sight we made. Before long, as fragrant mango juice bubbled onto our hands and ran in sticky rivulets down our chins, we were giggling too. At that moment we were in complete agreement with Tom Stobart, who once said that after eating a really good mango you need to take a bath.
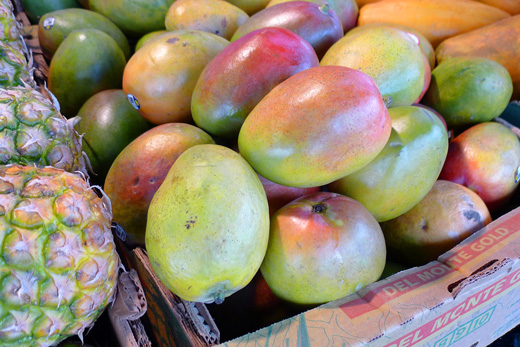
Around here, we find that the best way to enjoy the essence of ripe mangoes throughout the year is by making sweet mango chutney and canning it in jars. You’ll be surprised at how easy it is. And with its balance of sweet and salty, and a touch of vinegar, this mango chutney is guaranteed to be fresher tasting than the commercial versions available. Here’s the recipe I’ve been making for years, adapted from the ‘mango’ entry in Tom Stobart’s classic book, The Cook’s Encyclopaedia (copyright 1980 by Cameron and Tayleur Books Ltd.)
Tom Stobart’s Mango Chutney
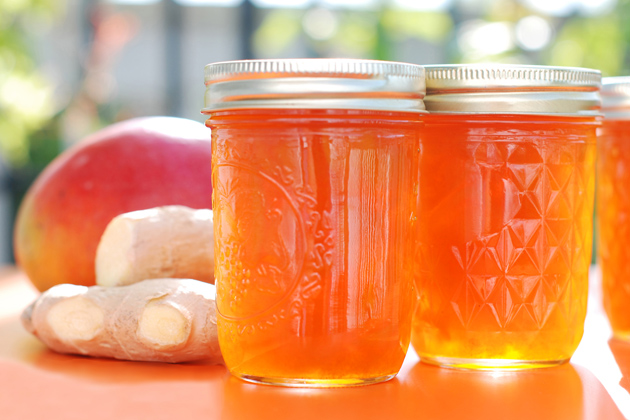
Makes 4 or 5 half-pint jars
For the spice bag:
1 small muslin bag or a nylon ‘footie’
1 teaspoon each of black peppercorns, cumin seed, cardamom and whole cloves
½ teaspoon of crushed red pepper
1 stick of cinnamon
1 thumb-sized piece of ginger
¼ of a medium onion in 3 pieces
1 large clove of garlic, crushed
For the chutney:
2 large mangoes, about 2 lbs. total weight
2 Tablespoons of salt
2 Tablespoons of water
3 cups of sugar
1/3 cup of white vinegar
½ teaspoon each of Fruit Fresh and turmeric (optional)
5 half-pint jars with new lids
Make the spice bag: Over the years I’ve tried a variety of bag-like things for steeping the spices in mango chutney, from sewn muslin bags to cut off, out-of-fashion tube socks. What I’ve found works best is either an ankle-high stocking or nylon footie. Put all the spices, onion pieces, garlic and ginger into the bag, and close it up tightly with a twist tie or some string.
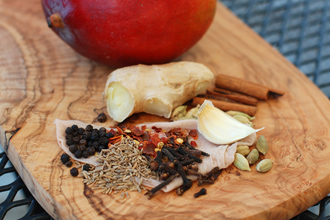 Sweet mango chutney spices ready for bagging Peel and slice the mangoes: Choose mangoes that are yellow to red in color but still firm. Cut two big halves out of each mango by working around the perimeter with a paring knife, keeping the blade thrust in against the stone’s flat side as you go. If all goes right, you’ll end up with two fleshy halves and a big flat seed. Peel each half with the knife and cut the flesh into flat chunks an inch or so long. Cut any flesh left against the seed into pieces as well.
Weigh the mango bits before you add them to the pot. The recipe is based on 22 ounces of mango. If you’re off significantly, either slice more mango or adjust the sugar and vinegar accordingly.
Make the chutney: Put 2 tablespoons of water, 2 tablespoons of salt and the peeled mango bits into a large saucepan. Bring to a simmer over medium heat, stirring constantly. Add the sugar and, when melted and hot, add the spice bag. Keep stirring. Now add the vinegar, lower the heat to medium-low and keep the chutney at a simmer for 20 minutes, stirring occasionally. Every 5 minutes or so flatten the spice bag with a wooden spoon to squeeze out the flavor. After 20 minutes, remove the spice bag.
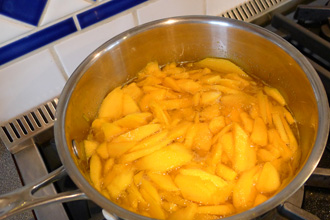 Mango pieces sliced and ready to heat (Hint: don’t throw the spice bag away just yet. You can put it into a curry, some stew or even a pot of chili to create a fabulous taste sensation!)
Keep the pan at a simmer for a few more minutes until the jars are ready. If desired, you can add ½ teaspoon each of Fruit Fresh (ascorbic acid) and turmeric at this point to brighten and stabilize the color of your chutney.
Can the chutney: Bring a large pot of water to the boil and put 5 clean half-pint canning jars into it. Boil for 10 minutes and set the jars upside-down on a clean cloth or paper towel until ready to use. Put a pint of hot water into a bowl and keep the lids (not the rings) in it until ready to use.
Turn the jars right-side-up and fill with hot chutney, leaving ¼” of head space. Adjust the lids, screw the rings down until the lids are just seated, and process for 15 minutes in boiling water.
For more on canning, see the Ball Blue Book.
You can enjoy your homemade mango chutney any time of the year. It’s great with everything from Indian food to tuna fish sandwiches. Go on, be inventive. My friend Judy’s baked brie smothered with mango chutney is always the hit of the party. Yum!
Gray smudges of cloud moved back in on Saturday, shedding brief raindrops, but for a change I didn’t mind. I reveled instead in a lush landscape that filled the near distance. Everywhere was green. Green new leaves with crisp new veining. Rich green grass that overtook the moss while we weren’t looking. Our back yard and everything around is suddenly bursting with new growth.
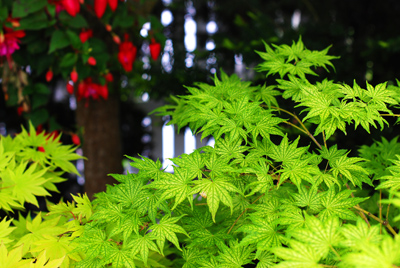 New leaves on Japanese Maple 'Shigilatsu Sawa' here at Chez Bullhog You see, the sun finally came out in Seattle last week.
For three glorious days everyone and his brother came out to play. Runners and cyclists jostled for position with the swarms of walkers at Green Lake. Sun worshippers perched like flowers with faces angled to catch the rays. Metal tables emerged from back rooms at restaurants just in time for the lunchtime crowd and were occupied before they could be set. And in true Seattle style there were sunshine slowdowns on the freeways.
There was a collective sigh of relief as the mercury pushed past 70 for the first time in ages. Hours later, however, the temperature dipped as the clouds crept in.
On Sunday, I ignored the weather and had a splendid time waging the Battle of the Spinach Balls. While the rest of Seattle shivered, I deconstructed an old recipe from the Main Line Cookbook that my sister’s been making for 25 years. Whistling happily, I pulled out half the fat and some of the carbs to bump up our favorite green stuff. As I popped my first attempts into the oven, the maple trees on the back porch nodded their leafy limbs in approval. By the third or fourth batch, even my wife the Salad Queen forgave the weather gods and pitched in with advice.
Here’s what we learned. To keep its shape, a good spinach ball can’t be too large. For best texture, it needs just the right balance of stuffing mix, spinach and cheese. To hold it all together, you can’t stint on the egg. Finally, for best flavor, you need just the right amount of salt. Our winner is a spinach ball with caramelized onion and feta cheese that tastes nearly as good at room temperature as it does fresh from the oven.
Now about our May weather? My advice is to adopt the perpetual optimism of the old timers. “Just wait 15 minutes,” they say. “The weather’s bound to change!”
I do hope they’re right.
Battle of the Spinach Balls: The winning recipe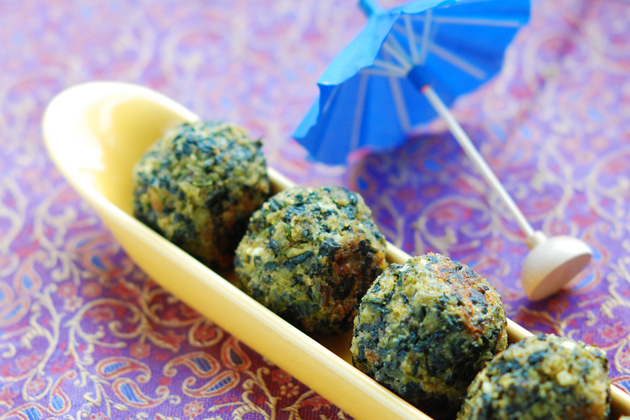
Makes 2 dozen 1¼” balls
1-16 ounce bag of chopped frozen spinach, partly thawed
5 ounces of herbed stuffing mix (see note below)
6 ounces of finely chopped onion
2 ounces of butter
2 Tablespoons of olive oil
2 ounces of good parmesan, finely shredded
2 ounces of crumbled feta cheese
1 clove of garlic, pressed
1 teaspoon of dried thyme
1 teaspoon of dried dill
¼ teaspoon of black pepper
3 large eggs
Stuffing mix note: You can use Pepperidge Farms herbed stuffing mix for this recipe or make your own. I made stuffing mix from three-day-old bread by cutting the loaf into ¼” cubes, spreading the cubes onto cookie sheets, topping them with herbs, salt, pepper and a drizzle of olive oil and baking at 300° for 25 minutes, tossing halfway through. Before adding to the recipe, I pulsed the cooled stuffing mix in a mini-prep blender for 5 seconds.
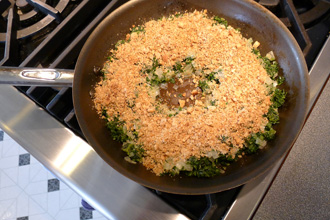 Spinach ball mix in the frying pan, ready to toss Thaw the Spinach: Thaw a 16-ounce bag of spinach at room temperature for 2 hours. By the time you use it, it should be mostly thawed but not dripping.
Partially caramelize the onion: Melt butter and olive oil in a 12” frying pan. Over medium-high heat, sauté 6 ounces finely chopped onion for 5 minutes, stirring as necessary, until onions are sputtering and beginning to brown at the edges. Lower the heat to a simmer and sauté for 5 more minutes until onions are translucent.
Make the Mix: Remove pan from the heat and toss the spinach in with the onions. Break up any lumps of spinach. Add the stuffing mix, cheese, pressed garlic and herbs and toss together. Whisk eggs in a small bowl and add last, binding the mix. Remove to a bowl and, for best results, refrigerate for an hour or two before shaping the balls.
Bake the Balls: Preheat oven to 325°. Lightly grease a cookie sheet with olive oil. Form balls that are a little over an inch in diameter and set them onto the pan so that they’re not touching. Bake for 40 minutes, turning twice during baking for even browning. If the balls want to stick to the pan, let them cool for 2 or 3 minutes before slipping a spatula under them.
You can serve these hot or cold.
The recipe my sister swears by, Hot Spinach Balls by Joanne Feehery Duffy, can be found in Philadelphia Main Line Classics (Copyright 1982 by The Saturday Club and Favorite Recipes Press). Many thanks to Joanne for leading the way.
If you have a similar recipe or variation, please feel free to share it in the comments below. We’d love to hear about it!

It was somewhere north of Lodi that the idea began to take shape. As golden California sunshine poured out upon glittering apricot groves in the central valley, I daydreamed about my campsite dinner. Fajitas, lightly browned on the Coleman stove, using the new griddle I’d snapped up the other day. Maybe a little fire to heat the tortillas: it was going to be perfect.
Behind me in the cooler I had a fine fat breast of chicken, finally thawed to perfection. At a rest stop I slathered it with herbs, olive oil and salt, wrapped it in plastic, and nestled it back into place beside the mondo hunk of ice. Later, when I came off the highway for a break, I found a little Mexican grocery where I got a medley of zucchini, onion and red pepper and some of Mrs. Renfrew’s salsa. Sizzling visions danced in my head. By the time I found the access road at Manteca and headed east across the Sonoran desert, I could already taste my dinner.
 Evening sunlight plays upon rock formations in the Yosemite Valley But in midafternoon, still two hours or more from Yosemite, my food fantasy began to fade. First, the man at the Tuolumne visitor’s center lifted his hat and scratched back his white hair when I mentioned camping in the park. He shook his head, but had the grace not to laugh out loud. Then, outside the park entrance I looked in at a dirt-covered BLM campsite where a sign told me that any open fire, even one from a Coleman stove, had to be permitted. To get a permit, I was told farther on at the park gate, I had to drive back a ways. Instead, I gritted my teeth and drove on through.
So began a brief interlude in the playground of the gods. The Yosemite Valley at any time is beautiful, but evening is the best. Low clear sunlight plays on the massive stone walls and waterfalls, bringing into focus every feature. For an hour or more, I followed the light, stopping with the crowds to stand in awed silence, the muted click of our cameras and the occasional sigh the only counterpoint to the distant sound of water and the ribbons of heavy night air that danced around in the valley.
And then began the mad rush. As light faded, a thousand cars headed for the south exit all at once. At each turnoff the same story was told: no room here; move on. Beside the parking lot at one crowded RV spot a frantic young couple was setting a small tent in the dusty glare of 30 headlights. I couldn’t believe this. I scrambled back onto the dark road heading toward the rest of California.
I woke the next morning to the sound of water spray and the cool feel of billowed grass under the tent floor. A bird was singing from branches that lazily threw shadows onto the thin fabric above me. I looked out onto a green landscape. Through a sleepy haze I tugged at the edges of the dream I’d been having.
After another splendid day, this one not nearly so hectic or fraught, I came back and made the meal I had imagined – all except for the fire. And later, my appetite well and truly sated, I fell asleep in the green green grass and dreamed of those elusive fajitas. Fajitas in the mist.
Fajitas in the Mist 
2 pounds of skinless boneless whole chicken breast
1 pound of zucchini
1 large red bell pepper
1 medium-sized onion
4 Tablespoons olive oil, divided
2 Tablespoons of dried thyme, leaves only
1 teaspoon of salt
Optional: ground cumin, chili powder and/or oregano to taste
1 jar of salsa
1 package of 10” flour tortillas
Camping Notes: This is a great recipe for car camping, where the added weight of a cast-iron griddle for your Coleman stove is no big deal. After marinating the chicken and wrapping it in plastic, you’ll want to put it inside Tupperware to keep it from mixing with the water at the bottom of the cooler.
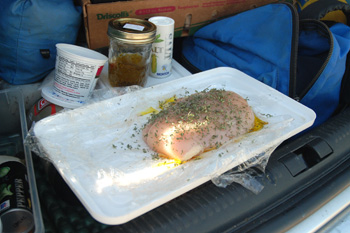 Chicken all dressed and ready to rock and roll Marinate the chicken: Leave breasts whole. Place the meat on a sheet of plastic wrap. Distribute dried thyme leaves and ½ teaspoon of the salt evenly over the chicken, and drizzle on half of the olive oil. Add extra cumin, chili powder or oregano on as well if desired. Now wrap the plastic tightly around the chicken and refrigerate for a minimum of 2 hours.
Prepare the veggies: Top and tail the zucchini, slice them lengthwise and cut diagonally into 1/2” pieces. Core the pepper, remove seeds and white inner ribs and cut it into thin strips. Peel the onion and slice it lengthwise. Arrange veggies on a plate, drizzle on some olive oil and sprinkle with ½ teaspoon of salt. Add cumin, chili powder and oregano if desired.
20 minutes before dinner: Heat a heavy frying pan over a medium-high flame and, after 2 minutes, pour in 1 Tablespoon of oil. Put in the chicken breast and heat quickly, turning after every 3 or 4 minutes as it browns.
15 minutes before dinner: Heat a second frying pan or a 10” griddle over medium-high flame for 2 minutes and then coat with 1 Tablespoon of oil. Put on the veggies and, keeping the heat as high as you can without the oil smoking, toss the veggies with a spatula as they cook. The veggies will be done in 10 or 12 minutes.
A few minutes before dinner: Slice the chicken crosswise on a plate. Return to the frying pan any pieces of chicken that are pink in the middle. Chicken will be perfectly cooked at the moment that pink turns white. No need to overcook it!
Bring the Fajitas to the picnic table hot and sizzling to serve with salsa and warm tortillas.
Oh, and if you happen to have a little fire nearby with a hot stone on which to warm your tortillas, I say go for it!
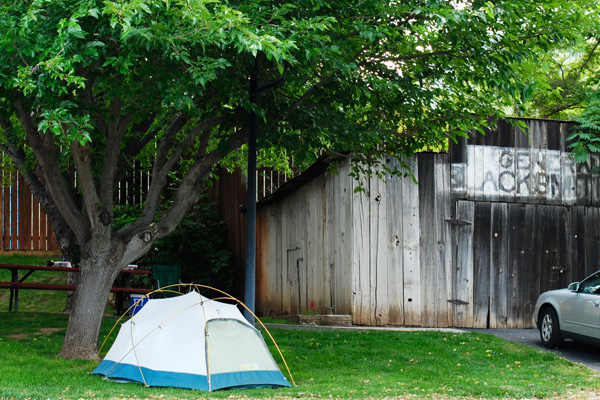 My campsite beside the old blacksmith shop at Mariposa Fairgrounds 40 miles west of Yosemite
The words I heard on the other end of the line struck terror in my pizza-loving heart. ‘I can’t eat wheat,’ my friend Alison announced in the lead-up to our long-anticipated woodfired dinner. Her voice was resigned and more than a little apologetic.
Aargh, I thought. Here we go. Rice flour; boring dough. But her next words changed things back around.
 Do these women look like they're suffering? ‘I’m not really gluten-intolerant, according to my doctor,’ she told me. ‘It’s just that I can’t tolerate the hybridized American wheat flours. I can do spelt, however,’ she added, almost as an afterthought.
Whew, I thought: gluten wasn’t the culprit. I clung to that distinction.
While nearly 20% of Americans say they’re wheat intolerant, the real number of people who need to live a gluten-free life is only ¾ of 1%. The rest have given up wheat for a variety of other reasons, in order to feel healthier. Some like Alison have developed sensitivities to the strains of wheat grown primarily in the U.S., which for her bring on nasty headaches.
Now I never want my pizza to cause anyone pain. So after making my regular dough, I cleaned away all remnants of local flour. To avoid cross-contamination, I even swapped out the hand towels. By the time people started turning up for the pizza extravaganza the spelt dough I’d made with 60% organic spelt flour and 40% Italian caputo flour was soft and bubbly. To shape it took a bit more coaxing than my normal dough, but the results were excellent. From the fire came pizza with a lightly browned crust that was nutty and chewy and not too dense.
As for Alison? After a while, I stopped watching her for signs. That extra-strength Tylenol stayed in her pocket for another emergency. And while I can’t guarantee the same results for the wheat-intolerant pizza lovers among you, I can at least offer up this recipe as another canon in your arsenal. Ciao!
Spelt Pizza Crust Dough
Makes 3 – 12” pizzas
2 cups of Organic Spelt flour
1½ cups of Typo 00 Caputo flour from Italy
(Both these flours are available in Seattle at Pacific Food Importers)
1¼ teaspoon of salt
1 teaspoon of dry yeast (2 teaspoons if you’re in a hurry)
1¾ cups of water at 100°
1 Tablespoon olive oil
Make the dough: In a large mixing bowl, dry mix the flour, salt and yeast. Make a well in the middle and slowly add the warm water, mixing with the handle of a wooden spoon until all ingredients are incorporated. Let sit for 30 minutes, covered with a piece of plastic, before kneading.
Kneading and first rise: Turn the dough out onto a lightly floured counter and knead for 5 minutes until soft and smooth. Clean out and dry the bowl, drizzle olive oil into it, and return the dough to it. Cover the bowl with plastic and let the dough rise in a cool place for 2-3 hours until doubled in bulk.
Second rise: Punch the dough down and let rise at room temperature for a further 2 hours.
Shape and bake: Deflate the dough only halfway, and divide into 3 pieces. Slowly spread each piece as needed into a 12” round on a lightly floured counter. Move to a pizza peel sprinkled with spelt flour, top with your favorite toppings and bake as you would any other pizza. See one way below.
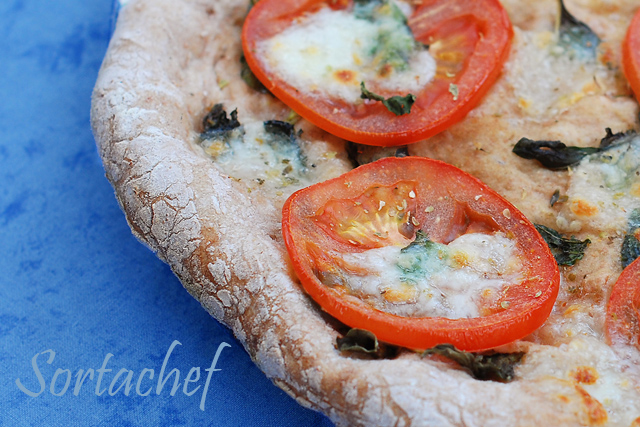
To make a pizza Margherita: Sprinkle 1 Tablespoon of olive oil on a pizza blank, and top with a handful of basil leaves, 5 ounces sliced tomato and 3 ounces of sliced fresh mozzarella cheese. Bake in a hot woodfired oven for 4 minutes, turning once, or for 7 minutes at 475° in a conventional oven directly on a pizza stone or quarry tiles. Sprinkle with salt and oregano before serving.
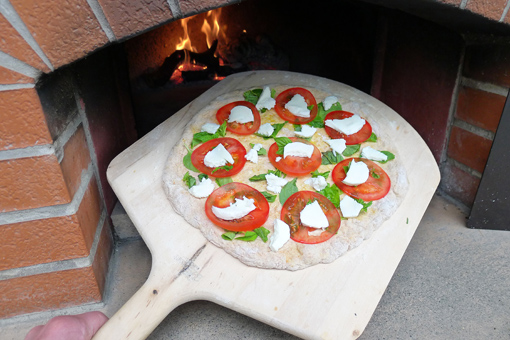 Pizza Margherita on spelt dough ready for the fire. Aaand, here are two bonus shots taken by Cookiebakerlynn and her husband:
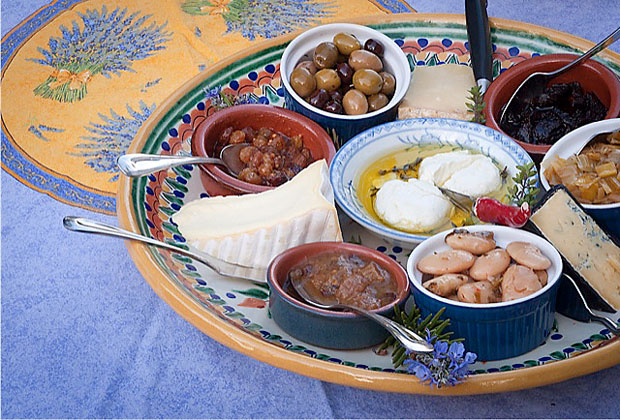 Alison's excellent antipasto platter 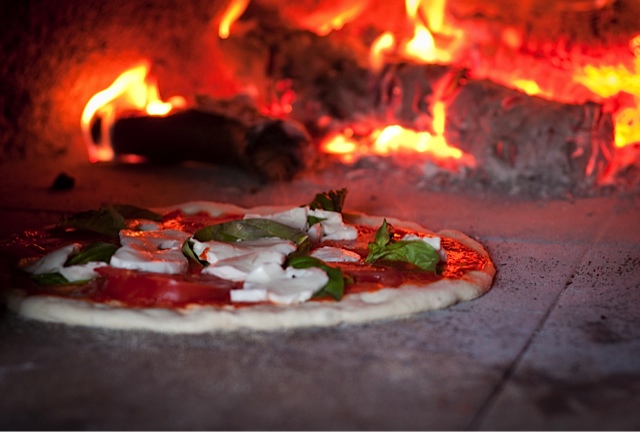 Margherita pizza in the fire
In mid-morning sunshine, we squint up at the Tuscan hill town that rises in a tangle of narrow streets and medieval buildings as far as our eyes can see. At the very top peeks a crenellated building that looks remarkably like a fortified castle. Sounds resonate in the clear Sunday stillness, bringing us back to our modern world: the thunk of a car door, the tap of high heels on a cobbled street, the moaning of children. More accurately: the moaning of our own children, who are up at this ungodly hour at the whim of their dear old dad.
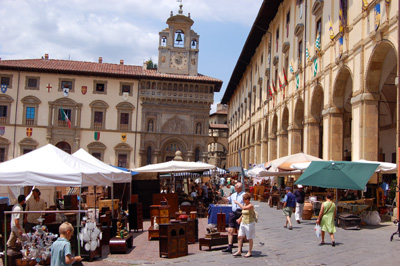 The Fiero Antiquario in the Piazza Centrale, Arezzo “Noo-oo, it’s still the middle of the night,” my daughter wailed when earlier I woke her, even though the sun was streaming through the open shutters of our little rented villa near Sienna. “What she said,” my son moaned, pulling the duvet back over his head.
Despite their protests, I made big cups of espresso on the gas stove and kept up the tempo while pattering barefooted across cool tiled floors. What better tonic for jetlag than activity, I reasoned? And so before long we found ourselves on that glorious summers’ day cruising past fields of sunflowers on the E78 past Monte San Savino to join local Italians and tourists alike streaming into Arezzo. Destination: the Fiera Antiquario.
If you’ve never been here, you can’t possibly understand. This is the antique market that one weekend each month transforms this ancient and prosperous town into an outdoor mecca for the avid collector. You want to buy an antique map? There’s a whole row of stalls for that, each one decked out in festive umbrellas to keep out the sun. Antique jewelry? There’s a whole street for that, reaching a half mile down like one of the arms of an octopus from the central square. Likewise streets and stalls for old fabrics, prints, hardware, tools, toys and bric-a-brac. At the very apex, the Piazza Centrale is full to overflowing with stallholders selling antique lamps, electronics and furniture. The merchants throw themselves into the affair with a gusto that is absolutely over-the-top Italian.
 Antique corkscrews for sale in the Fiero Antiquario The kids quickly shook off their jetlag in bright-eyed fascination. We sent them with a few euros to haggle over an old lock and some Italian comic books while we wandered the square with mild intentions of looking for old tools and estate jewelry. But really we were enjoying the whole pageantry of the town as it unfolded before us – totally happy just taking it all in.
As the July sun reached its zenith we followed the Italians into pockets of cool shade, perching in the recesses of an old church to wait out the heat. Under cover near the main square I watched a harried looking woman cut noodles in front of a restaurant. The 10 minutes it took her with a sharp knife to make strips of a pound of pasta could have been carved out of any of multiple centuries, with a technique older than any of the antiques on sale there in Arezzo.
Back in Seattle, I set to work. While my kids reconnected on Facebook, I sprinkled some semolina to keep the dough from sticking. At the same time my kids were busy telling their friends how little jetlag had affected them I ran the pasta through my trusty Atlas machine, keeping it thick on purpose. And then I cut it with a knife, the way it’s been done in Italy for hundreds of years. The woman in Arezzo was making Pici; my noodles turned out more like Tagliolette. But no matter: we gathered round the table, eager and hungry, and felt the connection all the same. To sun-drenched hills, stone walls, old vines, sweet grandmas pinching the cheeks of young children, and the crunch of gravel on cart tracks that take you through fields of bobbing sunflowers. Centuries of excellence, not to be missed. Buon Appetito!
.
Hand-cut Pasta with Woodfired Sausage and Mushrooms
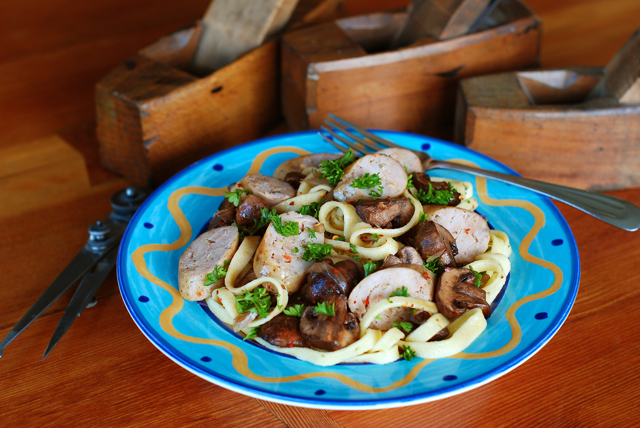
Makes 4 servings
For the pasta:
1 cup unbleached all-purpose flour
1 cup semolina
¾ teaspoon salt
2 eggs
3 Tablespoons of water
1 Tablespoon of olive oil
¼ cup semolina for bench work
For the toppings:
12 ounces chicken or pork Italian sausage links
1 pound of cremini mushrooms, halved or quartered
2 Tablespoons of olive oil, divided
2 ounces of shallot onions, finely sliced
2 cups of hot vegetable or beef broth
4 Tablespoons of chopped parsley
1 teaspoon of crushed red pepper
Optional: freshly grated parmesan
Pasta note: In the style of Arezzo, with its Etruscan roots, this pasta is thicker than Bolognese fettuccine and is made with fewer eggs. If you have the patience to cut the noodles into spaghetti-like strands that are as wide as they are thick, you’ll be making ‘pici’, the local pasta. Be forewarned: it’s not easy. Mine always end up a bit wider, but they taste just as good.
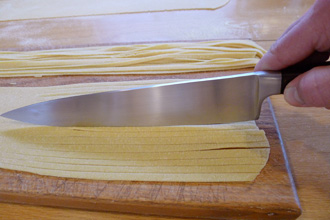 Cutting the strands of pasta with a knife Heat the woodfired oven:
Maintain a moderate fire in your oven for 2 hours, ending with a mound of glowing coals about a foot in diameter and 4 inches deep. Push the fire to the back, put on a stick of fragrant wood (like apple) as thick as your wrist, and sweep the floor clean of ashes. You’ll need a cast iron frying pan or some little cast iron pans for cooking the sausages and the mushrooms in with the fire.
Make the pasta dough: Mix flour, salt and 1 cup of semolina together in a bowl. Make a well in the center and break in the eggs. Whisk the eggs with a fork, gradually gathering the dry mix into the egg and then, as the mixture thickens, add water and oil. Pull in all the dry mix and knead for a few minutes in the bowl. If absolutely necessary, add 1 teaspoon (not Tablespoon) of extra water to make the dough soft enough to work. Put the dough onto a bit of semolina sprinkled on a counter, cover with the inverted bowl and let rest for 30 minutes.
Roll out and cut the pasta: Secure pasta machine to a work surface. Flatten the lump of dough and send it through the rollers on setting ‘1’. Fold in half and send through again and then, turning the long edges over toward the middle, send through a third time. Repeat until your pasta is smooth and supple. Cut the band of pasta into 3 pieces and let them rest on semolina for a few minutes before continuing. Now send each piece through the rollers on setting ‘3’. Let rest. Finally, send the pasta through on setting ‘5’. Sprinkle with semolina and let rest for 10 minutes before cutting.
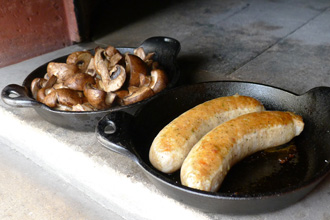 Sausages and Mushrooms fresh from the fire Cut each piece of pasta into long strips 3/16” wide using a 10” chef’s knife or other sharp knife. I find that you can make a whole series of parallel cuts (as shown in the photo above) before moving along the length of the uncut past. Hold the strips of cut pasta in a wide platter or tray until ready to boil.
Cook the sausage and mushrooms: Clean the mushrooms and cut into halves or quarters. Peel and slice the shallot. Heat a cast iron frying pan in the oven for a few minutes and then add 2 teaspoons of olive oil and the shallot and return to the oven. After 2 or 3 minutes, once the shallot is beginning to brown, add the mushrooms and ½ cup of the broth to the frying pan. Return to the oven and cook 5 minutes, turning halfway through. Once the mushrooms are lightly cooked, hold them to one side in a serving bowl and pour any broth from the frying pan over them.
Add 1 Tablespoon of olive oil to the frying pan and cook the sausages in it on the floor of the oven with the door nearly closed. Turn after 5 minutes, and bake for a further 5-7 minutes until lightly brown on two sides. Now pour in the rest of the broth and add back the mushrooms. Let simmer near the door of the oven while you cook the pasta.
Cook the noodles: Bring 4 quarts of water to a boil. Add the pasta and, once back at the boil, cook for 3 minutes. Drain the pasta in a colander and drizzle with olive oil.
Assemble the dish: Distribute the pasta among 4 bowls. Sprinkle on half the parsley and half the red pepper. Spoon the mushrooms and the broth over the noodles. Cut the sausages in pieces and add them as well. Sprinkle the rest of the parsley and red pepper over the dishes and bring to the table piping hot. It’s traditional to serve pici with grated parmesan, but I find it overwhelms the smoky flavors of this dish, so you might want to go easy on it.
Now imagine the glint of low evening sunlight playing on the weathered walls of an ancient hill town as you bite into these noodles. A sentry keeps watch high above in the tower. There’s the sound of the kids moaning again – not because of jetlag or the whims of dear old dad, but from delight at the savory flavors of this time-honored dish. Yum! Can it get any better? It’s all good here.
.
 Woman making pici in the Piazza Centrale, Arezzo
My son the meatatarian and I often connect over a good skewer of lamb which is grilled over hot coals until barely red in the middle. In Greece they might call this souvlaki, but in Turkey, where my skewers came from, all grilled meat like this is called kebab. Soaked in oil and spices for a few hours, the lamb melts into tenderness. Souvlaki or kebab – whatever you call it, it tastes wonderful.
The perfect pairing with these is homemade pitas, and at Chez Bullhog we consider Greek style to be superior. These pitas are softer and spongier than their Middle Eastern counterparts and, while they can’t be relied on for a good pocket, they make delightful wraps. Garnish with tomato, lettuce and tatziki for a real handful of a treat. Can you say ‘Yum?’
Here’s my recipe for both. Enjoy!
Grilled Lamb Kebabs with Homemade Greek Pitas
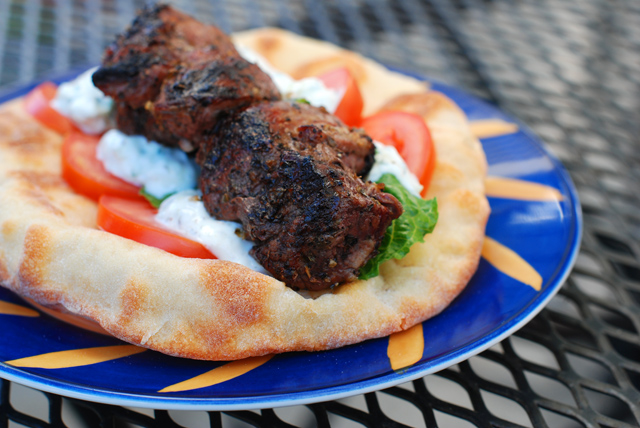
Quantity to feed 6 meatatarians
For the Lamb Kebabs:
2 pounds lean lamb from the shoulder or leg (see note below)
1 Tablespoon of dried oregano, preferably Greek
1 teaspoon of dried thyme
2 large cloves of garlic, minced or pressed
3 Tablespoons of good olive oil
Salt and pepper to finish
For the Greek Pita:
6 ounces of plain Greek yogurt
½ cup + 1 Tablespoon of water at 150°
2 cups of unbleached all-purpose flour
1 teaspoon dried yeast
½ teaspoon salt
½ cup flour for bench work
1 teaspoon canola oil
Lamb note: Consider buying a 3-pound boneless leg of lamb to make these kebabs; use two pounds of it for the kebabs and freeze the other pound for stew or curry. That way, you can cut out the more tender chunks for the kebabs and save the tougher pieces for longer cooking.
Marinate the Lamb: Cut lamb into 1½” pieces and put into a glass or metal bowl. Sprinkle with the oregano, thyme, minced garlic and olive oil and toss to coat thoroughly. Cover with plastic wrap and refrigerate for at least 3 hours or up to 8 hours before grilling.
Make the pita dough: In a small bowl, combine hot water and yogurt. In a mixing bowl, stir together the flour, yeast and salt. Now add the yogurt mix to the flour mix and combine well with the handle of a wooden spoon, scraping down the sides as necessary. Move the dough ball to a lightly floured surface and knead for 2 minutes. Clean the mixing bowl, sprinkle it with oil, put the dough in it, and cover with plastic. Let rise at room temperature for 3 hours.
Start the grill: A charcoal grill is best for these. With the lid off and the vents open, start about 25 briquettes and let burn until red. Spread them out in a circle and add another 25 before putting the grill surface into place. Let the coals burn another 10 or 15 minutes until hot and glowing. Scrape any burnt residue off of the grill surface and coat lightly with oil if desired.
Turn on the oven: These pitas are best baked on a pizza stone or quarry tiles set on a middle rack in your oven. Preheat the oven at 425° for 30 minutes.
Make the kebabs: Thread meat onto 4 or more skewers. Sprinkle generously with salt and pepper and grill over hot coals for 4 minutes on each of 4 sides. Remove to a warm plate and cover with a piece of plastic wrap while you make the pitas.
Form and bake the pitas: Cut risen dough into 6 equal pieces. Flatten each piece with your hand and then use a rolling pin to make 9” rounds. Use flour as necessary to prevent sticking.
Bake pitas 2 at a time directly on the quarry tiles or pizza stone. After 1½ to 2 minutes, once the dough is puffy on the top, turn the pitas over and finish for a further 1½ minute. Remove to a basket lined with a hand towel and cover baked pieces until ready to serve. Continue until all the pitas are baked.
Put it all together: Serve with tomato slices, lettuce and tatziki. Hummus is nice with these, too. Wrap as a sandwich if you like or use the pitas for dipping. Either way, this classic combination is a hit every time!
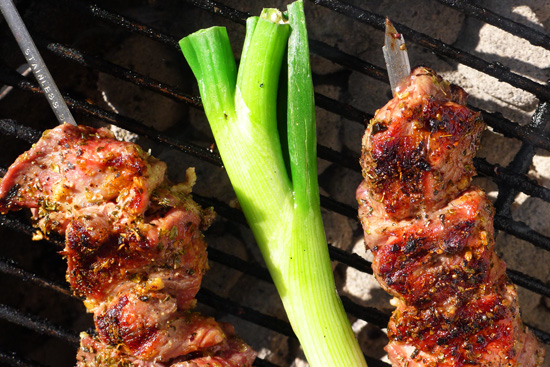 Lamb Kebabs on the grill with a stray green onion
With his thinning hair, slightly paunchy figure and unassuming manner, my 10th grade biology teacher wasn’t the kind of guy to win a teacher-of-the year contest. But to a 16-year-old boy he held a certain fascination. Dr. Bob showed us how to smell (or not smell) the contents of an unmarked bottle: fanning his fingers over the open cap and standing back comically so as not to inhale directly any unknown contents. And he had a weird habit of addressing us all by our first and last names, run together as one word. What clinched it for me, however, was the edible wild plant project he assigned to me that spring.
‘DonHogeland,’ he said one afternoon as he was hanging up his lab coat. ‘I’d love to give you an ‘A’, but you’re a good two percentage points away. For that, I’ll have to think up something big.’
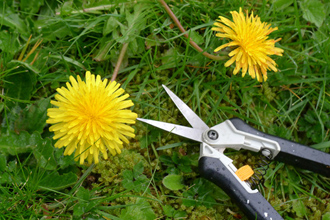 Dandelions in their wild state, ready to harvest The next day, Dr. Bob dumped a package of half-sheet newsletters on my desk.
Thus began my weekly demonstrations on the uses of edible wild plants. The newsletters came from Dr. Bob’s hometown in Maine, so not all the plants described were available in Eastern Pennsylvania. But I persevered. One week we had a salad made with wild mustard greens, another the tender fiddleheads of some local ferns sautéed in butter. My one near-failure was a tea made with last year’s sumac flowers, which gave off the flavor of old socks and floor sweepings. In response, there were many rumblings of dissatisfaction around the room. At the very last second one kid leapt to his feet raving about it (thanks, DaveKustin!) and so I got credit in the end. Dr. Bob stood to one side mildly grinning.
My greatest success was with Fried Dandelions. Just the flower heads – dipped in batter, fried and sprinkled with powdered sugar. They had a flavor somewhere between artichoke and arugula, and for novelty factor were a real hit. Before I knew it, I was making a second and then a third batch as news spread to other classes on the hall.
I don’t remember whether I bagged my ‘A’ or not. What I do know is those brochures sparked an interest in my seeing the natural world as an outdoor grocery store that I hold to this day. Now, when I pluck a wild northwest mushroom from the woods, I see in my mind’s eye Dr. Bob’s understated grin of approval, and it takes me right back.
As for dandelions? You can curse their appearance, or seize the moment to enjoy these first-of-the-season beauties. And what better way to get back at them for their peskiness? Go on; fry them up and eat them! Here’s my recipe.
Fried Dandelion Flowers
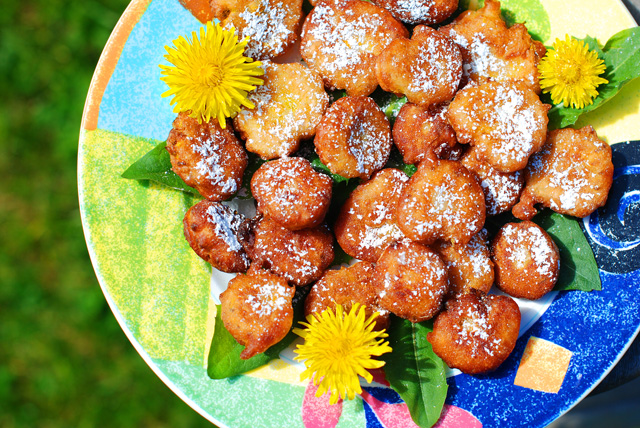
Makes 36 fritters
3 dozen medium-sized dandelion flowers (see note)
½ cup all-purpose flour
1 teaspoon baking powder
¼ teaspoon salt
2 teaspoons of sugar
4 Tablespoons of water
5 Tablespoons of milk
½ cup canola oil for frying
1-2 teaspoons of powdered sugar to finish
Dandelion note: The best dandelions for this are young, tender and medium-sized (about 1” across). Pick them from a lawn or bank that you know has not been sprayed with weed killer. They’re at their freshest in the late morning when they first open to the sun. Oh, and they’re packed with vitamins, too!
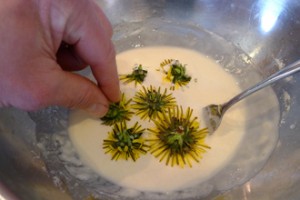 Make the batter: In a shallow mixing bowl, mix the flour, baking powder, salt and sugar together well with a fork. Now gradually stir in the water and milk to create a smooth batter. Work out the lumps and scrape the sides as necessary. Make the batter: In a shallow mixing bowl, mix the flour, baking powder, salt and sugar together well with a fork. Now gradually stir in the water and milk to create a smooth batter. Work out the lumps and scrape the sides as necessary.
Prepare the dandelions: Trim the milky stems right to the base of the flower, leaving the green bud intact. From this point on, you’ll want to avoid licking your fingers both for hygiene reasons and because the taste of the raw milk is mighty bitter! Don’t say I didn’t warn you…
Heat the oil: Pour the canola oil into an 8” frying pan and heat it slowly over medium heat. The oil will be ready when a test dollop of batter cooks to medium brown on the bottom in 30 seconds. Arrange a plate with two layers of paper towel beside the pan and have a spatula and a pair of tongs handy.
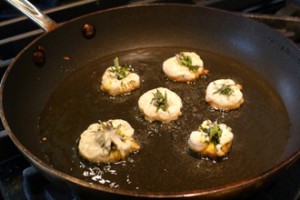 Make the fritters: Dip 6 dandelions at a time yellow-side down into the batter, using the green knobs as handles. Quickly fork a little of the batter onto the green bits, but don’t try to coat the backs entirely. Make the fritters: Dip 6 dandelions at a time yellow-side down into the batter, using the green knobs as handles. Quickly fork a little of the batter onto the green bits, but don’t try to coat the backs entirely.
Put the 6 battered flowers face down into the hot oil so that they keep their flower shapes and fry for 30 seconds until medium brown. Now flip them over, pushing the tops gently with the spatula as the green sides cook, and fry for a further 30 seconds.
Using the tongs, remove the fritters to the paper towel to cool. Repeat the process until all the flowers are fried.
To finish: Sprinkle with powdered sugar and serve warm.
And as you bite in, I want to ask you the same question I asked my 10th grade friends on that day so many years ago: Can you believe that anything so weed-like as a dandelion can taste so good? Yum!
 Dr. Bob's method for smelling the liquid in an unmarked container
|
A sample text widget
Etiam pulvinar consectetur dolor sed malesuada. Ut convallis
euismod dolor nec pretium. Nunc ut tristique massa.
Nam sodales mi vitae dolor ullamcorper et vulputate enim accumsan.
Morbi orci magna, tincidunt vitae molestie nec, molestie at mi. Nulla nulla lorem,
suscipit in posuere in, interdum non magna.
|
|


