A sample text widget
Etiam pulvinar consectetur dolor sed malesuada. Ut convallis
euismod dolor nec pretium. Nunc ut tristique massa.
Nam sodales mi vitae dolor ullamcorper et vulputate enim accumsan.
Morbi orci magna, tincidunt vitae molestie nec, molestie at mi. Nulla nulla lorem,
suscipit in posuere in, interdum non magna.
|
It’s tomato time here in Seattle. Despite a late start and some serious coddling through a cold northwest June, our plants burgeoned into maturity in July and – after a long stretch of glorious weather through August – began yielding luscious red beauties a few weeks ago.
Finally.
At Chez Bullhog, when our tomatoes are ripe we have a growing list of fresh tomato favorites that grace the table: bruschetta topped with diced tomato, garlic, basil and good olive oil; fresh tomato Pizza Margherita; and the ever-popular Fresh Tomato Lasagna.
Now there’s a new kid on the block. This No Noodle Lasagna – layers of sliced tomato, wilted spinach and fresh mozzarella baked with a parmesan béchamel topping – has tons of flavor with almost no carbs. As a side dish or as the main event, it’s a winner every time!
No Noodle Lasagna with Garden Fresh Tomatoes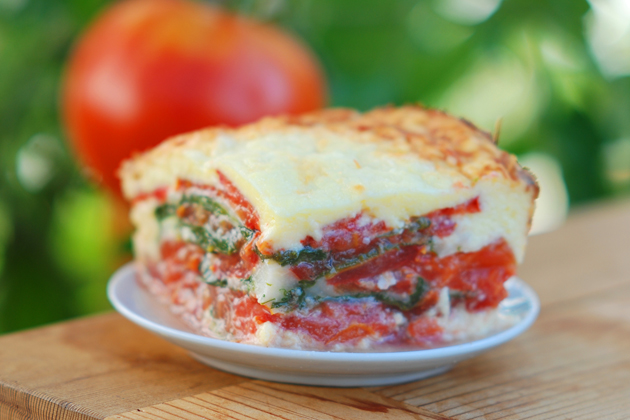
2 pounds of fresh tomatoes
12 ounces of fresh spinach
2 cloves garlic, minced
2 Tablespoons of olive oil
8 ounces of fresh mozzarella balls
1 Tablespoon butter
2 Tablespoons of bread crumbs
1 teaspoon of dried oregano
¾ teaspoon salt
1 ¾ cups of parmesan béchamel sauce (recipe below)
Prepare the layer ingredients: Slice the tomatoes ¼ inch thick, discarding the ends and coring if necessary. Wash and drain the spinach. In a large frying pan, heat 2 tablespoons of olive oil over medium heat, toss in the garlic and then the spinach. Turn once, frying for about 3 minutes until most of it is wilted, and set aside. Take the mozzarella balls out of their liquid and slice thinly.
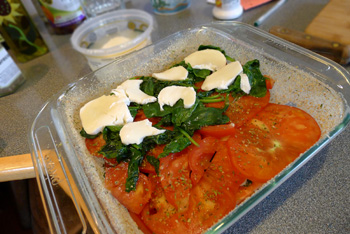 Building the layers for No Noodle Lasagna Assemble the layers: Butter the sides and bottom of an 8” x 8” pyrex pan and coat it with 2 tablespoons of breadcrumbs. Put a quarter of the tomato slices on the bottom in an even layer and sprinkle with oregano. Top with 1/3 of the wilted spinach and 1/3 of the fresh mozzarella. Generously sprinkle with salt.
Continue building the layers the same way and finish with a final layer of tomato.
Make the béchamel: In a small saucepan over medium heat, melt 2 tablespoons of butter until melted; mix in 2 tablespoons of flour. In 6 parts, add 1 1/3 cups of milk to the sauce, a little at a time, stirring constantly. Essential for smoothness is that each portion of milk heats and combines thoroughly with the sauce before proceeding to the next addition.
In a bowl large enough to hold all the sauce, whisk 2 eggs until frothy. Now add the hot white sauce to the egg in 6 portions, a little at a time, stirring constantly until all has been incorporated. Stir in ¼ cup of freshly grated Reggiano Parmesan.
Quickly pour the hot béchamel sauce over the tomato layers and spread it evenly before it has a chance to set. Sprinkle a little more parmesan on top if you like.
Bake and serve: Bake for 35 minutes in a preheated 375° oven until the top is lightly browned and the juice is bubbly.
Let cool for 10 minutes before slicing and serving. Because the flavorful juice from the fresh tomatoes is sure to pool around the lasagna, it’s best to serve each portion on its own small plate.
Now raise a glass to fresh tomatoes at their finest. Yum!
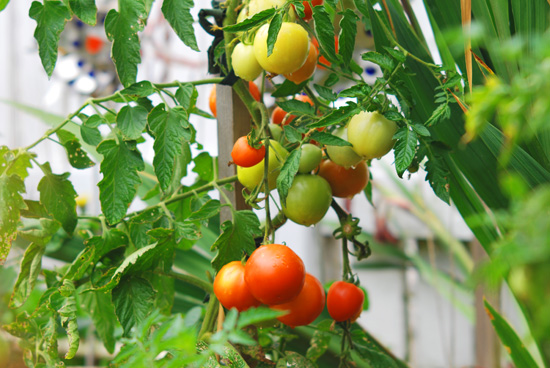 Late season tomatoes ripen on the vine at Chez Bullhog
Intense rivalry charged the warm air that lingered around the Piazza del Campo in Siena that night. Hoards of young Italians swarmed the square with flags held high, ranting, gesticulating, and then moving off to blend into side streets. Some were in street clothes and some medieval costume. As groups came through in waves, each behind a different flag, bellows and catcalls rang from within the old stone buildings all around.
This was Sienese bravado – centuries old bravado – all in a fantastic lead-up to the Palio, Siena’s famous horse race.
 A couple of cute Italian kids sporting Palio flags in the Campo Our waiter ducked beneath a section of folded-back bleacher and came to us looking deflated. “Va via!” he said shooting a dark look at the latest group crowding the flimsy barrier at the edge of the temporary dirt track, and stared until the revelers moved away.
“Aren’t you from Siena?” I asked him, surprised at his rancour.
“Si, si, my family has been here for many years,” he said. Yellow light lit his face as he pulled himself up proudly. “We are the bakers, Il Lupo. But this race means nothing to us, because my contrade is not a part this time. Besides, even when we do race, we have not won since I was a boy.” He took our order and went to glare at some Germans homing in on the next table over.
As the sky darkened the warm tones of the Campanile evolved into a more stunning backdrop for the medieval pageant that played out before us. We settled back into modern chairs, watching bats flap down to scoop up unseen bugs over the heads of the revelers. At ground level heat wafted from warm cobbles. By the time our pizzas arrived we’d slipped into a thoroughly blissful state.
Now while we were only spectators to the events preceding the Palio, we could pretend – just for the moment – that we were locals. It was easy to do in such a setting, with the centuries-old drama playing out on the enormous square, which doubled for now as a race track. After all, we said, we could growl with the best of them. And so, with our bellies full of Pizza Margherita, we raised our flags high and waded out into the crowd.
.
Siena Style Pizza Margherita with Fresh Tomatoes
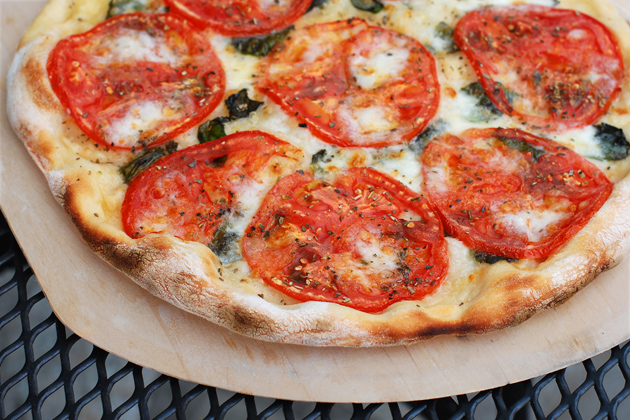
For each 12” pizza:
11 ounces of pizza dough (see recipe below)
6 ounces of thinly sliced vine-ripened tomatoes
3-4 ounces of fresh mozzarella
10 leaves of fresh basil
1 Tablespoon of good olive oil
¼ teaspoon of salt
½ teaspoon of dried oregano (optional)
Make the dough: Mix 2½ cups of all-purpose flour, 2 teaspoons of dried yeast and ¾ teaspoon of salt with 1 cup of warm water. Knead well and put into a large bowl with 2 Tablespoons of olive oil to keep from sticking. Let rise at least 2 hours in a warm place. This will make enough for 2 pizzas. (For better pizza dough, we use half caputo flour from Italy, cut the yeast in half and let rise for 5 hours.)
For baking in a woodfired oven: Start the fire 2½ hours before you plan on baking the pizza, and build up a mature fire with a nice bed of coals in the center of the oven. An hour before baking put several 3-inch thick sticks on the fire and, once they’re flaming, move the fire from side to side to heat the floor. The oven is ready when ash on the side walls and top is white. Move the fire to the back and put on another few mid-sized logs. They should have a nice even flame when the pizza(s) go in. Brush the floor clean of ashes.
For baking in a conventional oven: Put a pizza stone or quarry tiles on the center rack of your oven and preheat to 450º for at least 30 minutes.
Make the pizzas: Divide the dough into two pieces and spread each piece out on a floured surface until it is 12” in diameter. Sprinkle two peels or cookie sheets with a little cornmeal or flour to allow the pizzas to slip and then move each pizza onto them. Top with basil, olive oil, thinly sliced tomato and pieces of well-drained fresh mozzarella. Sprinkle with salt (necessary) and oregano (optional).
Bake the pizzas: Slip each pizza directly onto the floor of the pizza oven or onto the quarry tiles. Pizzas are baked when the edges of the crust are browned and the cheese is bubbly. In a hot woodfired oven, they will be done in 4 or 5 minutes, and in the conventional oven they will reach perfection in 7 or 8. Turn pizzas around halfway through cooking.
A note about the ingredients: With such a simple pizza, the quality of the ingredients is everything. The best oil, good fresh mozzarella from a local source and freshly picked basil can make all the difference. If you have the time, use the smaller quantity of yeast and let your dough rise for a full 5 hours. And last but not least, use your own vine-ripe tomatoes or buy them from a farm stand. I find the best tomatoes and ripen them for a few days on the kitchen counter until they’re barely soft to the touch.
Now you’re talking Italian!
 The Camponile in Siena at night
I left the trail to scrabble through waist high ferns, pushing aside pesky branches as I climbed. A hundred feet up the tangle gave way to a sparse grove studded here and there with massive stumps from old growth trees long gone. These giants of the landscape – each one the size of a small house – stood in quiet tribute to a forest that once was.
Down on the ground, the duff is cushion-like and scuffs easily. Its very softness is why I’m here: under this airy layer of pine needles, decaying wood, leaves and soft mosses is where the mushrooms are. I walk carefully, peering at every crevice on the forest floor that might be the leading edge of a mushroom cap.
And then on the far side of a fallen log I saw the tell-tale glint of creamy orange. Five ears pushed at the duff, straining together toward filtered sunlight. With a bit of careful lifting on my part and a few well-placed swipes of my trusty knife I soon had them freed. It was a sight to behold: five fat chanterelles, the first of the season, pale and lovely on the forest floor.
As I lifted my sack and wandered off into the forest, my heart lightened with anticipation. Oh, yeah, I said to myself. There’s going to be feasting at Chez Bullhog tonight!
Wild Mushroom Linguine with Chanterelles and Arugula
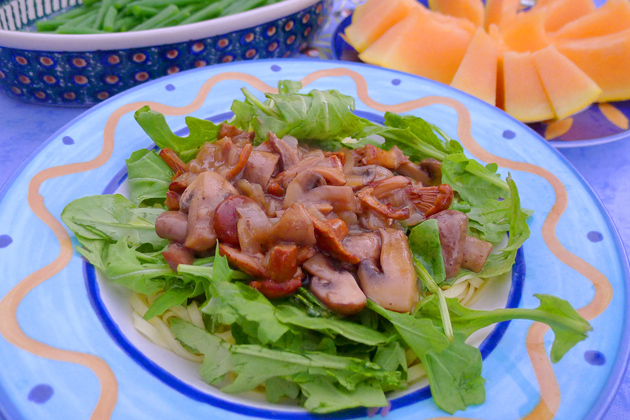
Makes 3-4 servings
6 ounces fresh chanterelles, brushed clean
8 ounces cremini mushrooms, quartered
Half of a medium onion, coarsely diced
1 Tablespoon of olive oil
1 Tablespoon of butter
Salt and black pepper to taste
1 Tablespoon of dried porcini mushroom, broken into bits
¾ cup boiling water
1 Tablespoon of flour
10 ounces fresh linguine, cooked and drained
2 cups of arugula
¼ cup of grated Parmesan (optional)
- Break chanterelles into 1 inch pieces and into segments for the larger mushroom heads. Sauté half a chopped onion in a tablespoon each of olive oil and butter until translucent, about 5 minutes over medium heat, and then add the chanterelle pieces. Turn the heat to low and add the quartered cremini mushrooms. Gently sauté for a further 5 minutes or more, until the mushrooms are cooked through but not flabby. Remove from the heat.
- Meanwhile, pour boiling water over the porcini pieces and let stew in a ramekin or coffee cup for 15-20 minutes. This will yield a heady ‘tea’. After steeping, remove any mushroom pieces that feel hard and add the soft bits to the sautéed mushrooms, but save the liquid.
- In a second ramekin or coffee cup, mix a tablespoon of flour with a tablespoon of hot mushroom tea. Add small amounts of the tea, stirring all the time to keep it lump-free, until you have added it all.
- Bring sufficient water to a boil and cook 10 ounces of fresh linguine according to package directions.
- Three minutes before the pasta is finished, bring the mushrooms back to a simmer and add the enhanced mushroom tea to the pan. Stir constantly until the mushroom mixture is bubbly and the sauce thickens slightly. Add salt and pepper to taste.
- Divide the pasta among 3 or 4 bowls, sprinkle on a little olive oil and top each with a handful of arugula. Put portions of mushrooms and sauce directly onto the arugula, top with parmesan if desired, and bring piping hot to the table. Yum!
Mushroom Sense: For those in the know, chanterelles are relatively easy to identify. Before you head out to find your own, however, it’s recommended that you take a mushroom hunting class. Here in Seattle, you can contact the Puget Sound Mycological Association for info.
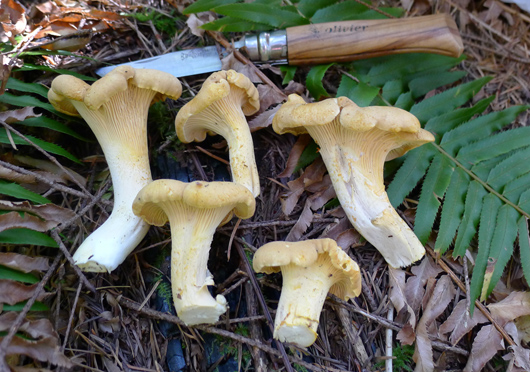 First of the season: Five fresh chanterelles
‘Yum!’ My daughter in her newly fashioned pink-tipped hair wandered into the kitchen with the intention of grazing. ‘Why don’t you make bread like that more often?’
I was slicing fat slabs of fresh focaccia, still steaming from the oven. Plates were laid out with heaps of spaghetti and meatballs on the counter, and I was happy to see the light shine in my child’s eyes as she took it all in. As any parent of teenagers can tell you, dinner time is often a hit-or-miss event.
Her phone buzzed like a fly on the counter but my daughter ignored her latest text message and set the plates on the table instead. My son ambled into the room, slid into a chair and slouched back.
‘Cool,’ he said, eying the basket of bread. ‘Hey Dad. Why don’t you make bread like this more often?’ He grabbed a hunk in one hand and with the other reached a knife out for the butter.
Why don’t I? Considering it’s so easy – and considering the effect it has on my teenagers! – I guess I don’t have a good answer for that.
Focaccia made with yesterday’s Dough
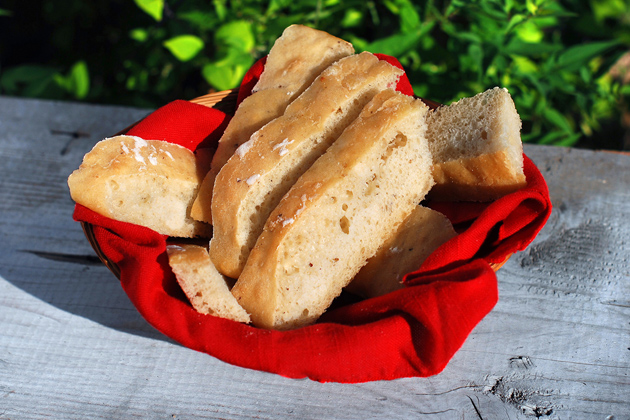
16 ounces of day-old dough (see note)
2 cups of all-purpose flour
1 cup of warm water
½ teaspoon of salt
¾ teaspoon of dry yeast
3 Tablespoons of olive oil
2 cloves minced garlic or ½ teaspoon of garlic granules
Dough note: If you’re anything like me, you’ve got some leftover dough from the previous day’s pizza or bread. This day-old dough is perfect for focaccia because it helps give variety to the bubbles in the bread and improves its texture. Another way to make this recipe is to mix 2 cups flour, 1 cup water, ½ teaspoon of salt and ¾ dry yeast together and let it bubble away overnight. The next day, use it in place of that day-old dough.
Mix the dough: Combine day-old dough, flour, water, salt, dry yeast and 1 Tablespoon of olive oil. Let sit for 1 to 1½ hours at room temperature until bubbly.
Knead and shape: Spread 2 teaspoons of olive oil out onto a cookie sheet in an area roughly 10”x14”.
Turn the wet dough out onto a well-floured surface. Using a dough scraper, knead the dough for a few minutes by lifting the edges and folding them over. Sprinkle more flour on top and quickly press with your fingers to work out any bubbles. Make a rectangle with the dough that’s about 1” thick.
Put the dough onto the oiled cookie sheet and let rise in a warm place for 1 hour.
Bake, top and bake: Preheat oven to 425°. Bake the focaccia for 10 minutes until lightly risen. Remove from the oven, brush with remaining olive oil, garlic and a generous sprinkling of salt. Lower oven heat to 400°. Bake bread for 15 to 20 minutes until lightly browned on top.
Remove to a rack to cool for 15 minutes. Slice into thick hunks and watch your kids’ eyes light up as they dig in. Enjoy!
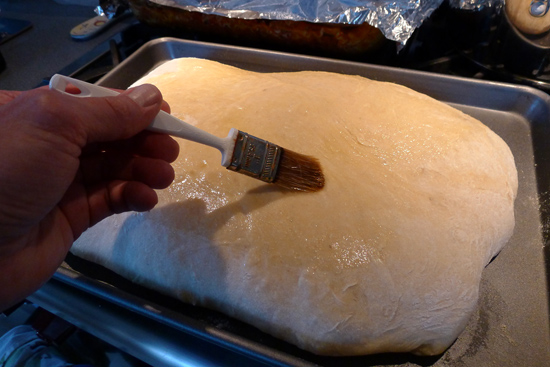 Brushing oil onto the partly risen focaccia
On Oahu’s North Coast, the weather service bases its forecast on how high the waves are going to be that day. You can get a good meal at the Grass Skirt Grill, but be advised that the owner won’t be around if the surf is high. Some things are more important than food, you know.
Now if you want to bring this laidback feeling home, pizza on the grill is a great way to go. You’ll need a heavy gauge steel pizza pan that has half-inch holes all over the bottom to do the job right. The hot coals will do the rest, permeating your pizza with their smoky flavor. The tanginess of barbecue sauce only accentuates the flavors of this pizza that’s crispy on the bottom and chewy on the top. If you like your pizza a little darker, you can always pop it under the broiler for a good finale.
So go on, exotic up your grill with this fabby Hawaiian style pizza. Kowabunga!
Hawaiian Style Barbecued Pizza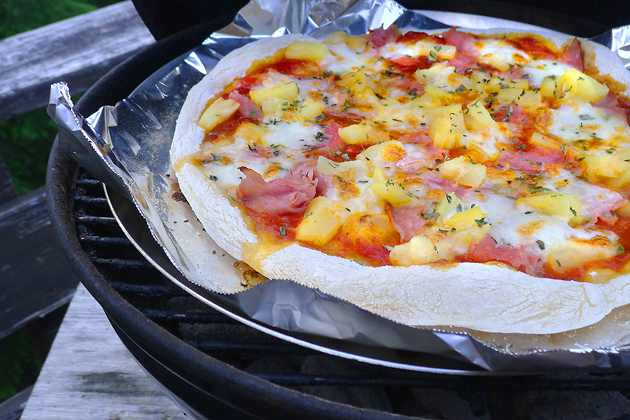
For each 11” pizza
12 ounces pizza dough, your fave or click Here to see ours
½ cup BBQ pizza sauce (see below)
3 slices of Black Forest ham
4 rounds of Hawaiian pineapple, chunked and squeezed
4 ounces of fresh mozzarella cheese, well drained
Make a hot fire: Light a pile of 30 briquettes in a small kettle grill. When red through and through, spread them into a ring and add 10 fresh briquettes for staying power. Put the grill piece in place and center the perforated pizza pan on top of it. When the pan has heated for 5 minutes, you’re ready to rock and roll.
Make the sauce: For easy barbecue flavor, mix ½ cup of tomato sauce with ½ cup ketchup. Add a teaspoon of dried oregano, ¼ teaspoon each of black pepper and minced garlic, and 1/8 teaspoon of cayenne pepper. Heat the sauce over medium heat until steaming and then stir in ¼ cup of brown sugar. Double quantities if you’re making 4 pizzas.
Build the pizzas, one at a time: Sprinkle a 12” square piece of aluminum foil lightly with flour and set it aside. On a moderately floured counter stretch out 12 ounces of pizza dough into a circle roughly 11” in diameter. Put the dough blank onto the foil.
Top with barbecue pizza sauce, strips of ham, pineapple chunks with the juice squeezed out, and shreds of fresh mozzarella. Top with dried oregano, if desired.
Barbecue the pizzas: Carefully move the pizza on the foil to the barbecue grill and put it in place on the perforated pan. Grill for about 4 minutes, until the dough is puffy. Now put the top onto the kettle grill and bake for about 3 more minutes, until the cheese has melted. Finish under a broiler for another minute if you want the top browned.
When making multiple pizzas, add a handful of fresh briquettes and open the vents between pizzas. It means waiting 10 minutes between pizzas, but no worry. The surf is up and the sound of breaking waves makes a soothing background to an excellent evening treat.
Some tiki torches to add to the ambience? A piña colada or two? Now you’re talking!
 Fresh Pineapples for sale at a stand on Oahu's North Coast
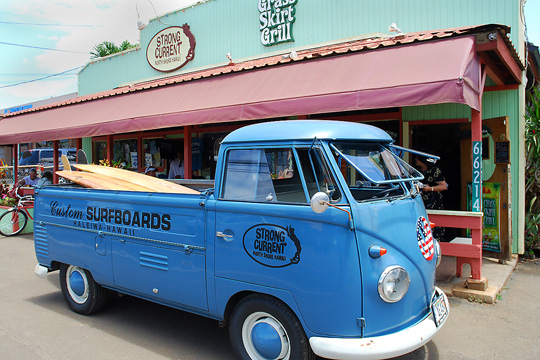 The Grass Skirt Grill on Oahu's North Coast. Try the fish special!
Sunlight dances among soft treetops of alpine fir, lifting a light morning mist to reveal Lichtenberg Mountain in all its glory. Even in August a smattering of snow still clings to its craggy crevices. In a final standoff with the clouds, the sun retreats to shade the mountain for a moment, and then bursts out to intensify new greenness in the high meadow. I watch fascinated for a while as the sun creeps onto the great gray outcropping of rock that crowns the mountain. When I look again the whole sleepy giant, now swathed in yellow light, stands there boldly.
 Falls along Nason Creek, flowing down from Lake Valhalla The cabin filled with the heady smell of yeast tinged with woodsmoke and pine as I watched the play of sunlight on the mountain. There was a low fire in our old woodstove, just enough to shake the chill night air that lingered, and on the funky orange counter a big batch of dough sat rising. Potato dough. I was in my element here, totally happy to sit among the trees and watch the hummingbirds divebomb the feeders. But the whole great mountain outside illuminated the possibilities of the day: there were meadows to wander, rocks to explore, lakes to visit.
And a waterfall to check out.
The steady rush of Nason Creek had been curiously loud for early August. I headed down into the forest to see it, clawing my way through dense undergrowth along a feeble trail. Beside a wide spot that once held a railroad bunkhouse and has now become a marshy meadow, I took a little trail to the left. Well hidden in the vegetation, a white plume of water spilled furiously over pale rocks beside our fishing hole. The sound of its tumble was like a freight train. All I could do was to close my mouth as I gazed.
Back at the cabin, I sent the bread into the oven and settled in with a good book while it baked. Beyond the window, the great panoply of nature played out. The tall trees stretched new growth to the warm sun. A pair of jealous hummingbirds retook the small feeder with a daring dash. A Stellar’s jay checked for new food on the corner of the deck, calling raucously. The smell of fresh bread wafted. And above it all reigned the hulk of Lichtenberg Mountain, stately as ever against the clear summer sky.
Oh, yeah. It’s all good here.
Lichtenberg Mountain Potato Bread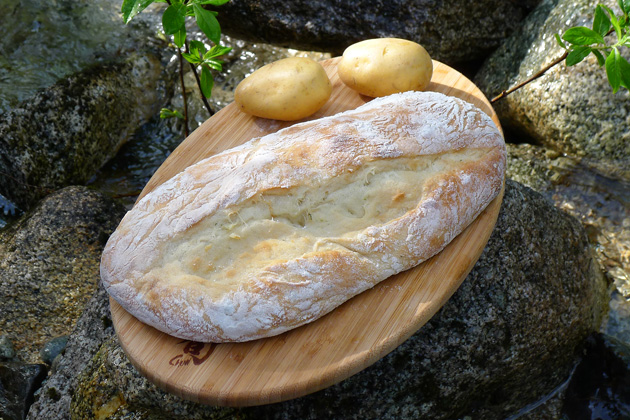
Makes 2 loaves
2½ cups of unbleached all-purpose flour
7 ounces of 105° water (see potato note)
1½ teaspoons of active dry yeast
2 teaspoons of sugar
1 teaspoon of salt
1½ cups of mashed potatoes (see note)
1 cup of flour for bench work
6 quarry tiles or a pizza stone (for best results)
Potato note: Because not all mashed potatoes are alike, results may vary. The mashed potatoes I used were moderately mushy, made with Yukon Gold potatoes mixed with butter, salt and 2% milk. If your potatoes are stiff, add another ounce of water to the mix to achieve a soft dough.
Preliminary dough: Using the handle of a wooden spoon, mix 2½ cups flour, the water, yeast and salt together in a large mixing bowl. Scrape down bowl and mix thoroughly to create a stiff dough ball. Cover and let rise in a warm place for 1 hour, until slightly risen.
Potato addition: Now comes the fun part. Sprinkle a counter generously with flour. Mix the potatoes into the dough in the bowl using first the spoon handle and then your hands. Have a dough scraper or spatula handy to scrape the bowl and your fingers (this dough is messy but easy to roll off of your hands.) After a few minutes, scoop the ball onto the floured counter and knead for 5 minutes. As the dough is so soft, you can add back any bits of dough scraped from your hands.
Once the flour from the counter has been incorporated, put the dough ball back into the bowl and let rise, covered, for 1½ to 2 hours until doubled in size.
Shaping and final rise: Clean off the counter and lightly flour it for shaping. Line two baskets with cloth and generously sprinkle the cloth with flour. Tip the dough out onto the counter and split it into two portions, quickly rolling each piece into a rough loaf. Put the loaves into the baskets, cover lightly and let rise for a further hour.
Baking: Put quarry tiles or a pizza stone on the center rack of your oven. Preheat oven to 425° for at least 20 minutes. Turn the loaves out onto a floured peel or the back of a cookie sheet and slash each with a serrated knife. Slip them directly onto the quarry tiles in the oven.
After the first 5 minutes lower the heat to 375°. Cooking time for these loaves is about 25 minutes total or until the crust is medium brown.
Relax and enjoy: This bread is soft and a bit sweet with a lovely chewy texture. It’s great with eggs or cheese and works well as a dipping bread for hummus. Try it with a picnic lunch and, if possible, find a nice creek, a pleasant meadow, and a mountain to crown your experience. Enjoy!
 View from the Bullhog's cabin: Lichtenberg Mountain reigns supreme!
My grandmother was always a great one for thrift. In her house you could open any drawer to find bits of string, twist ties, rubber bands from every newspaper that landed on her doorstep or old Christmas cards she used by the bucketload for making lists. In later years, she’d show up at our house and – right at that moment when the dinner table was all set to my mother’s exacting standard – announce that she’d brought, say, a pear to go along with dinner. She just couldn’t stand to see anything go to waste.
 My grandparents with their beloved dog 'Dinky', circa 1980 Once as a boy, after having been treated by my grandparents to Smorgasbord at the Collegeville Inn, I looked up to see my little Scottish grandma surreptitiously filling her handbag with food. The man who came to clear plates saw what she was doing, but before he could say anything my grandma quickly closed her bag. Then she sat there all sweet and innocent as if nothing had happened. We looked at our plates.
“Lord knows they have enough food here,” she said brightly at last, pushing aside the incident. “The least they can do is spare some for the dog!”
We all laughed. My grandfather shook his head and gave her one of his looks, but I remember him laughing too.
Now, Grandma’s go-to ingredient in the kitchen was oatmeal. Oatmeal featured in her meatloaf. It went into hamburgers to make more patties from a pound. And last week at the cabin, when I was looking for a way to stretch my dwindling supply of flour, I remembered that about her. Sure I could have driven 25 miles to a store to get some more flour. But would my grandma go and do that? Never in a million years!
And so, with my little Scottish grandma looking over my shoulder, I took down some rolled oats and mixed them with hot water. I added my other ingredients once the oats had cooled. After two rises, I made some rolls that were sweet and a bit nutty, just perfect for any occasion. A bit of smoked salmon? Some kale brose, or cock-a-leekie soup?
Oh, yeah. Grandma definitely would have approved!
Grandma’s Scottish Oat Rolls

Makes 6 or 8 rolls, depending on size
1 ¼ cups of rolled oats, divided
2 cups of hot water (150°)
1 ½ teaspoons of dry yeast
2 ½ cups of all-purpose flour
1 ½ teaspoons of salt
¼ cup brown sugar
2 Tablespoons of softened butter
¾ cup flour for bench work
Soak the oatmeal: Put 1 cup of rolled oats into a large mixing bowl and reserve the other ¼ cup for later. Pour 2 cups of very warm water over the oats and let them sit for 30-40 minutes until the oats have swelled and the water temperature has dropped to about 100°.
Make the dough: Add yeast, 2 ½ cups of flour, salt sugar and softened butter to the oat mixture. Mix thoroughly with the handle of a wooden spoon, scraping down the bowl as necessary. Let dough sit for 10 minutes and then turn it out onto a well-floured surface and knead for 10 minutes to make a soft dough.
First rise: Cover and let rise at room temperature for 1 ½ to 2 hours until nearly doubled in size.
Second rise: Punch down and invert the dough. Cover and let rise 1 to 1 ½ hours at room temperature until nearly doubled in size again.
Shape the rolls: Lightly grease a cookie sheet and sprinkle it with half the remaining oats. Turn the dough out onto a floured surface and divide into 6 or 8 pieces. Form pieces into slightly flattened balls and arrange them an inch or so apart on the oat-covered cookie sheet. Brush the tops of the rolls twice with some warm water and then sprinkle the rest of the oats onto them. Push down lightly with your hand to make the oats stick better. Cover rolls with a tea towel and let rise for a final 45 minutes.
Bake the rolls: Preheat oven to 400°. Bake rolls for 25 minutes, until the tops are nicely brown. Remove from the oven and cool for 30 minutes on a rack before digging in.
And watch out for little Scottish grandmas at your table. You just might catch them slipping some of those lovely Scottish Oat Rolls into their bags for an evening snack. Just kidding, you know, Grandma!
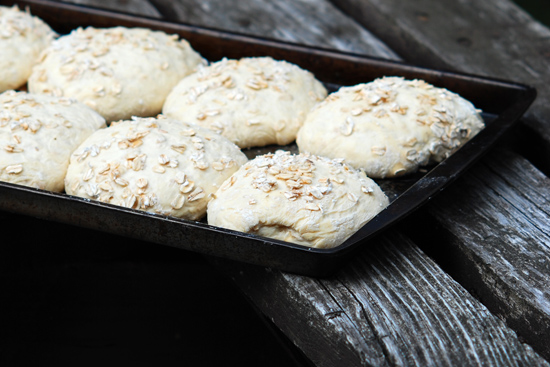 Scottish Oat Rolls in their native habitat before baking
Some years ago while hiking with friends on the eastern slopes of the Cascade Mountains, I came across a band of people wandering through the forest. In their billowy clothes and long hair, they looked a little like wood elves as they meandered off the trail among the trees, occasionally dropping to take something from among the pine duff on the forest floor. When a young man sporting a blond goatee and a pixie cap came near, I asked him what they were after.
‘Oh man, check out these mushrooms,’ he said, lifting his basket. There was sparkle in his fine eyes. ‘Morels. Soaked in cream and then sautéed, they’re just the best. In fact, they’re magical. Hey man, there’s one right now!’
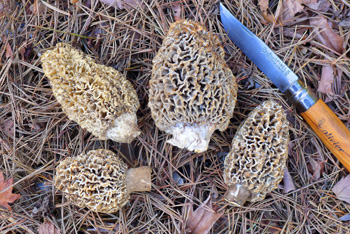 Wild Northwest Morels ready for the pot He bent down and cut a little pine cone shape from the pathway beside my boot. If he hadn’t noticed it, I would’ve walked right past. He handed the mushroom to me and disappeared as my friends gathered around.
The rest of our hike, even under the weight of backpacks, became a fantastic game of hide-and-seek. It took a while to develop what we call our ‘mushroom eyes’ – that ability to pick out mushrooms from their setting, but by the time we got to our campsite some miles later, we’d found two or three pounds of the elusive critters. That night, we had succulent sliced morels heated in red sauce over dueling MSR stoves. We ate our spaghetti seated around a roaring campfire as a million stars came out to fill the sky overhead.
Now if you’re lucky enough to find morels in the wild, you’re in for a rare feast. They’re one of the most flavorful of mushrooms, and their texture is out of this world. If you do have to buy them, expect to pay a premium, but know that a little goes a long way. An ounce or two per person can change a meal from ordinary to stellar.
And as to soaking morels in cream? It’s a tried and true method that’s a bit too rich for me, so I compromise at 2% milk and then finish them in olive oil and butter. Tossed with pasta or as a topping for your favorite grilled meat, you can’t go wrong.
Here’s a great way to add a little magic to grilled salmon.
Grilled Salmon with Sautéed Morels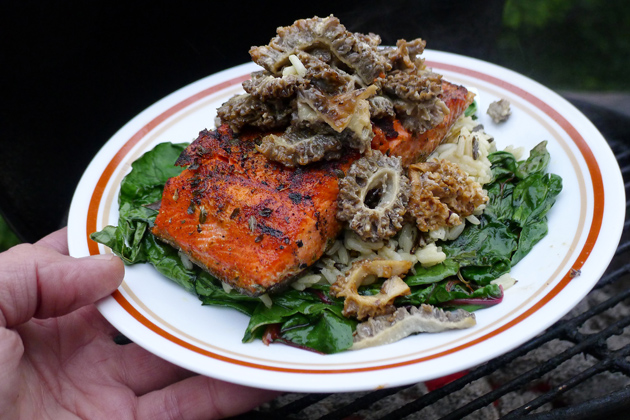
Makes 2 generous portions
4 ounces of fresh morels, cleaned with a brush
6 ounces of 2% milk
½ teaspoon of salt
1 Tablespoon each olive oil and butter
2 pieces of fresh wild salmon fillet, 6 ounces each
Paprika, herbs and salt and pepper to taste
Herbed rice and Swiss Chard for plating (optional)
Soak the morels: Clean the mushrooms of any dirt or pine needles using a brush, and trim the stalk end if necessary. In a 1 quart bowl, combine the milk and salt and then add the morels whole, pushing them down into the milk mixture. Let soak for at least one hour.
Prepare the grill and salmon: At least half an hour before grilling, get 25 briquettes of charcoal going in a small grill (I use a Smokey Joe from Weber). Brush salmon pieces with a little olive oil and sprinkle on paprika, thyme, oregano, salt and pepper. Cover lightly and let sit at room temperature while the coals heat up.
Make rice and Swiss Chard: Since salmon goes so well with rice, I recommend it as a bed for this dish. My guilty secret is that, to minimize the hassle, I often make the boxed Long Grain and Wild Rice and use only half the packet of seasoning. Hey, it’s simple! And, since Swiss Chard is fresh right now, you can sauté a little in butter and serve it on the side for a healthy and colorful addition.
Sauté the morels: Remove the morels from the milk and slice them into half-inch pieces. Heat a 10” frying pan over medium heat for a few minutes. Add oil and butter and sauté the mushrooms for 3 minutes, stirring once or twice to heat the pieces evenly. Do not overcook. The morels will be done when they are limp and just beginning to brown.
Grill the salmon: Spread the coals. Adjust the grill surface and let it heat up for a few minutes. Scrape the grill surface clean.
Put the salmon pieces face down with the flesh side to the heat. Grill for 4 minutes and then turn the pieces with a spatula to put the skin side toward the heat. Depending on thickness of the fillet and the heat of your coals, the salmon should be ready in 6 to 8 minutes.
The magical touch: Put some rice on each plate, surround with Swiss chard and arrange the salmon on the rice. Now top with the sautéed morels, and let the magic begin. Enjoy!
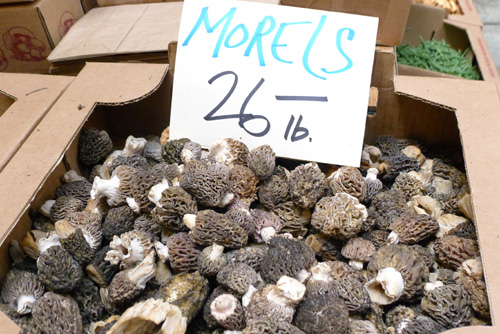 Fresh morels for sale at the Ferry Terminal Building in San Francisco
So fresh and easy: this sandwich, made in the Italian style, is perfect for a summer’s day.
Take slices of sourdough bread, sprinkle with olive oil and oregano and a touch of salt and pepper. Top with peppered turkey, swiss cheese, romaine lettuce and slices of sweet cherry pepper. Enjoy with your favorite book and a frosty mug of root beer.
Lounge forever in the garden. How good can it get?!

My daughter’s friend opened our fridge the other day and let out a shriek. ‘What the heck is this?’ She held out a plastic tub crusted on the rim with what looked like pancake batter. A thin puddle of dark liquid covered its doughy contents.
‘Whoa, careful,’ I said, taking it gingerly from her hands and putting the lid back on. ‘That’s my favorite starter, made with wild huckleberries. It makes great bread. At least, it does when it wants to.’
 Two sourdough starters not required for this recipe! Lily, who’s been a fan of my bread for a whole long time, grimaced. ‘You make bread with this stuff? That’s so gross.’
No, not gross, Lily: a bit unusual maybe. If she’d stuck around long enough to listen, I might have told her about the wild yeast thing and the health benefits of long-rising dough and all that, but by then she’d found the key lime pie yogurt and was off again.
If you’re anything like me, you’ve got a few of these sourdough starters lurking in your fridge. One I made from organic California grapes lovingly teased into fruition over 10 days some years ago. Another from rye flour that naturally ferments. And last fall’s brainchild, made from mountain berries plucked at 3600 feet. That last one yielded 6 lovely loaves and then promptly went into a funk.
But I’m going to be honest here: I don’t use any of my starters in this recipe. Every one of those starters is finicky and unpredictable at best, and when it comes to making bread, reliability is the key. So I’ve come up with a method that yields great sourdough loaves in a 3-day process. Very little attention is necessary until the third day, and the results are amazing. If you don’t have a woodfired oven, instructions on baking in a conventional oven are included as well. Go on, relax and make some sourdough!
Don’s Woodfired Sourdough Bread
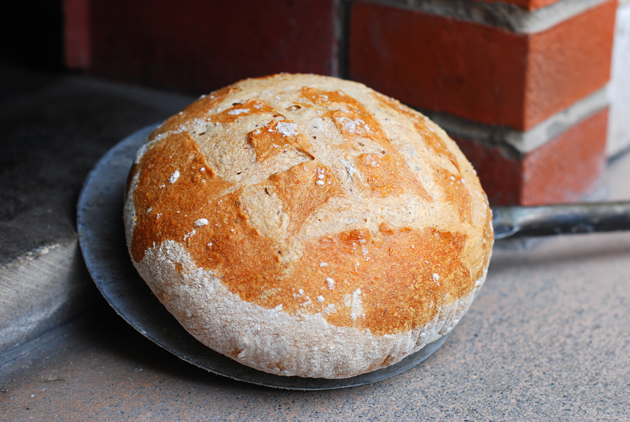
Make 3 loaves, 23 ounces each
For the Starter:
2/3 cup rye flour
2/3 cup unbleached all-purpose flour
¾ cup cold water
1 teaspoon active dry yeast
Mix these together in a large bread bowl with the handle of a wooden spoon, scraping the sides clean as you go. Cover with a clean dish cloth or a loose-fitting lid and let rise in a cool place (55-60° environment) for 12-14 hours until frothy. I do this step in the early evening and let it go overnight.
First replenishment:
½ cup rye flour
½ cup unbleached all-purpose flour
3/8 cup cold water
Add these to your starter to ‘feed’ it in the morning. Scrape the sides again, put on a loose-fitting lid or a piece of plastic wrap and let it sit in a cool place for another 10-12 hours.
Second replenishment:
1 cup unbleached all-purpose flour
½ cup cold water
Feed the starter again, this time with wheat flour only. Let sit covered in a cool place for 10 hours or overnight. By morning, the starter should be bubbly and somewhat risen. It will also smell sour, which is the smell of active lactobacillus fermenting in the mix. This is good.
Make the dough:
All of the starter
2 cups of water at 105°
½ teaspoon of active dry yeast
4 cups of unbleached white bread flour (I use Pendleton Mills ‘Morbread’ with 12% gluten)
3 teaspoons of salt
2 Tablespoons of flaxseed meal (optional)
1 cup of flour for bench work
Using the handle of a wooden spoon, stir the water, yeast, 4 cups of bread flour, salt and flaxseed into the starter. Mix well, scraping the sides of the bowl to incorporate all the ingredients. Knead for 10 minutes on a lightly floured surface.
Return the dough to a clean bread bowl, cover and let rise for 5 hours at room temperature (68-70°).
Deflate the dough, turning it over as best you can and leave to rest for a further 1 to 1½ hours before shaping into loaves.
 My two-day starter, ready to rock and roll For Baking in a Woodfired Oven: For best results, bake this bread in an oven that has been heated for 2½ hours by a medium-sized active fire. In the last hour, move the fire from side to side to allow even heating of the floor tiles. After this time, move the active but non-flaming coals to the back, throw on a fistful of hardwood twigs and sweep the floor clean of ashes. Once the twigs have finished burning, you’re ready to bake the bread.
For Baking in a conventional oven: Line the center rack with quarry tiles or a pizza stone and preheat at 450° for at least half an hour. When the loaves are ready for baking, drop the heat to 400°.
Form the loaves / final rise: Turn the dough out onto a lightly floured counter and divide the dough into 3 equal pieces. (note: if using a conventional oven, you can only bake 2 at a time; put one of the pieces back into the bread bowl for another hour.) Form a ball with each piece by stretching the longest skin of dough across the surface and tucking it underneath.
Line 3 baskets with cloth napkins or dish cloths, and sprinkle generously with flour. Plop the dough balls into these, toss on a bit more flour, cover with the corners of the cloth and let rise for 1¼ hours in a warm place.
Once risen, turn the unbaked loaves onto either a wooden peel or the back of a cookie sheet sprinkled with cornmeal. Brush loaves lightly with an eggwhite mixed with 1 Tablespoon of water and slash as desired.
For Baking in a Woodfired Oven: Slip the unbaked loaves into the oven in a semi-circle about 12” away from the coals. Close the door all the way and bake for 1 hour, turning several times to bake evenly. Loaves are ready when the crust is medium brown.
For Baking in a conventional oven: Slip loaves 2 at a time directly onto the tiles or pizza stone. Bake for 20 minutes at 400°, lower the heat to 350°, and bake for another 40 minutes, turning the loaves as necessary to ensure even baking. Loaves are ready when the crust is medium brown.
This bread is great with seafood, chowder and salad. Our favorite Friday meal is fresh Dungeness crab served with grilled asparagus, sourdough bread and glasses of chilled Prosecco. Give it a try!
|
A sample text widget
Etiam pulvinar consectetur dolor sed malesuada. Ut convallis
euismod dolor nec pretium. Nunc ut tristique massa.
Nam sodales mi vitae dolor ullamcorper et vulputate enim accumsan.
Morbi orci magna, tincidunt vitae molestie nec, molestie at mi. Nulla nulla lorem,
suscipit in posuere in, interdum non magna.
|
|


