A sample text widget
Etiam pulvinar consectetur dolor sed malesuada. Ut convallis
euismod dolor nec pretium. Nunc ut tristique massa.
Nam sodales mi vitae dolor ullamcorper et vulputate enim accumsan.
Morbi orci magna, tincidunt vitae molestie nec, molestie at mi. Nulla nulla lorem,
suscipit in posuere in, interdum non magna.
|
In the wee hours of a recent night the greater part of a Challah loaf went missing. I might have suspected Santa or his hungry elves if it weren’t for the trail of crumbs that led to a few bites of sandwich left scattered in the kitchen sink. Turkey and swiss: sure signs that my son the meatatarian had been snacking.
His midnight raid got me thinking. If Challah is so tasty (which it is) and makes such a good sandwich (which it does), then why not have it more often – say, in sandwich roll form? So I made these rolls a few days ago and, with visions of savory sandwiches dancing in my head, I retired for the night.
One roll, nibbled around the edges, was all that remained in the bag the next morning. In his bed, my son slept on in angelic innocence. I closed his door quietly, reflecting on the difficulty of being 14 again: in one fell swoop I’d crashed the gates of that awkward age. Here was a father’s love, wrapped up in a package that for once was not rejected. Was I angry? Heck no! I rolled up my sleeves, took down some flour and, whistling, got back to work.
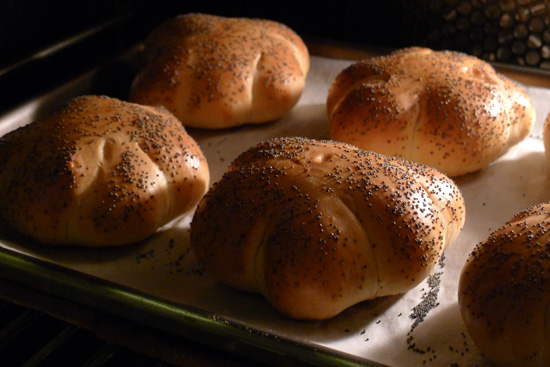
Challah Rolls 
Makes 6 large rolls, 4.5 ounces apiece
For the sponge:
½ cup of water at 105°
2 teaspoons of dry yeast
½ cup of boiling water
A small pinch of saffron threads
1 cup of King Arthur’s or similar bread flour
For the dough:
All of the sponge
1 large egg
1 Tablespoon of sugar
1 teaspoon of salt
3 Tablespoons of butter, softened
2 cups of King Arthur’s or similar bread flour, divided
For the glaze:
1 egg yolk + 1 teaspoon of water, mixed well
2 teaspoons of poppy seeds
Make the sponge: In a large bread bowl, mix ½ cup warm water with 2 teaspoons of dry yeast. In a small bowl or measuring cup, crumble a pinch of saffron into ½ cup of boiling water. After 15 minutes, put 1 cup of bread flour into the yeast mixture and pour the cooled saffron tea on as well, keeping back the strands of saffron. Mix well with the handle of a wooden spoon until there are no lumps of flour. Cover and let sit in a warm place (80°- see note below) for 1½ hours until frothy.
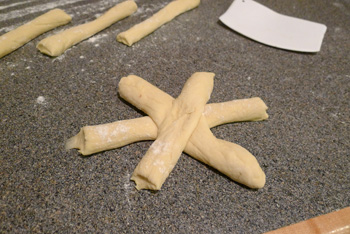 The Star Make the dough: Add one egg, 1 Tablespoon of sugar, 1 teaspoon of salt and 3 Tablespoons of softened butter to the frothy sponge. Now add 1½ cups of bread flour and mix until you have a soft dough. Scrape down the sides of the bowl as necessary.
Sprinkle the remaining ½ cup of flour onto a counter, scrape the dough out of the bowl onto it, and knead the dough for 5 minutes until most of the flour is incorporated. Clean out the bowl, put the dough back into it and let rise, covered in a warm place for 1½ hours, until doubled in bulk.
Make the rolls: Put the dough back on the counter, press most of the air out of it and cut it into 6 pieces. Roll each piece into a rope about 15” long. Cut each rope into 3 pieces and use these pieces to make a star. Flatten the center of the star with your thumb and then bring the 6 ends into the middle as shown. Push the center down with your thumb to make these ends stick.
 The Fold Put the rolls 2 inches apart on a cookie sheet lined with parchment (best) or coated lightly with butter. Brush each roll 2 or three times with an egg yolk well mixed with a little water. Sprinkle generously with poppy seeds.
Let rise for 45 minutes.
Bake the rolls: Preheat your oven to 400° for 20 minutes. If you have a pizza stone (or quarry tiles), set it on the middle rack. Lower the temperature to 375° and bake the rolls for 22 to 25 minutes, until nicely browned on top. Remove to a rack to cool before digging in. Enjoy!
Note: To create an 80° environment, turn on your oven for 2 minutes and then, once it’s mildly warm, turn it off again. Now put a pan of boiling water on a low shelf in the oven and turn on the oven light. Put the dough on a higher rack. Or, you can put a 100 watt light into a cupboard along with a thermometer. With some finagling, you can achieve excellent results.
Now, if you happen to have teenagers in the house and you want some rolls for yourself, I’d recommend you either make an extra batch… or hide a few, which is what I ended up doing!
The sharp ring of metal on ice breaks the still mountain air. My old coal shovel bites at the crusty snow, scaring off some resident blue birds who’ve flown in looking for a handout. In an hour I’ve cleared enough deck space to accommodate them. They squawk and squabble as they hungrily attack seed I’ve laid on the icy brown rails, and then fly off to shiver in the branches of nearby trees.
 A Steller's jay searches for food on the snowy rails of our deck. At 3600 feet it’s definitely winter here. Cold enough for crispy snow, for frost on every exposed surface, for all the snow machines to be lined up at the entrance to our unplowed road. Cold so engulfing it takes me hours and hours to warm up the cabin. All I can do is hunker by the fire to warm my hands while my back freezes. But a thousand feet up on the slopes of Mount Lichtenberg the snow has melted from the trees and the rock is all exposed. It’s downright balmy up there. Go figure.
I came to shake off Black Friday and Cyber Monday and to recharge my batteries. There’s no internet up here, no European debt crisis, no Afghan conflict, no recession. It’s just me and the trees and the snow and the mountain and the feisty Steller’s jays.
I watch their escapades from my own comfortable perch, safe and warm now inside. Later, as tree shadows lengthen and the bold mountain fades, I throw extra wood on the fire and get out the big frying pan. At our very seventies almond stove I whip up risotto: a little white wine, Arborio rice, some onion. And turkey soup, lovingly packed in just for the occasion.
By turns the firelight burns gold and red and orange, tongues that dance and leap against the firebox. Night sets in, blacker than black, but I don’t care. The cabin is finally warm and cozy. Pine sap pops and hisses, bursting into white flames that rage and retire. I sit in the glow, rapt in wonder, as the fire crackles and the smell of rich risotto mingles with woodsmoke.
Meanwhile, the cold and all that other are right outside. But for the moment – as far as I’m concerned – they might as well be a million miles away.
Fireside Turkey Risotto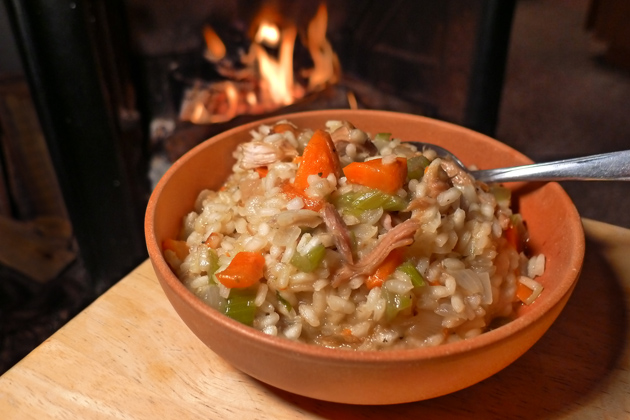
Makes 2 generous portions
3 Tablespoons of good olive oil
6 ounces of yellow onion, chopped
1 cup of Arborio rice
5 ounces of Pinot Grigio or other white wine
1 quart of homemade turkey soup (see note)
2 ounces of grated Reggiano Parmesano or Grana Padano cheese
About the turkey soup: I baked the carcass of the Thanksgiving turkey in salted water to cover for 3 hours and made turkey soup with the stock, adding a cup each of mirepoix and turkey chunks to finish (Yield: 2 quarts of soup). If you don’t have your own, you can substitute 3 cups of chicken or turkey stock in the risotto. Sauté carrots and celery with the onions and add ½ cup of turkey in the last 5 minutes.
To make risotto:
- Heat the soup in a 2-quart pan until simmering. Remove the turkey bits, carrot and celery with a slotted spoon and reserve. If you don’t have 3 cups of broth, add some hot water or chicken stock. Keep the broth simmering in the pan.
- Heat olive oil in a 12” frying pan over medium heat and sauté the onion for 3 minutes until barely translucent. Add rice and cook for 1 minute more, stirring to coat the rice.
- Turn the heat to medium high and add the white wine. Turn the rice over once or twice in the next 2 minutes. When the wine is mostly absorbed, set the timer for 17 minutes*.
- Add 1 cup of hot broth to the risotto. After 5 or 6 minutes on the clock, add another cup of hot broth. Throughout the cooking time, turn the rice over with a spatula every 2 minutes. Add small amounts of broth toward the end of the time if all the liquid gets absorbed. It is not necessary to add all of the broth; every brand of Arborio rice is different.
- With 2 minutes left on the clock, add the reserved bits from the soup to the rice. Stir gently to incorporate.
- Once 17 minutes is up, your rice should have a creamy consistency. Remove from the heat, stir in the cheese and serve immediately.
*High altitude timing is longer. At 3600 feet I figured 19 minutes.
Now about that fire. A couple of sticks of wood, a nice fireplace and a comfy chair. A glass of wine, maybe? Yeah, now you’re talking!
 Snow machines only past this point! Mt. Lichtenberg in the distance.
I remember my father driving, more than a little recklessly, down a country road. Fields of brown cornstalks shot past us, low green hedges, bright red barns that whizzed by in a blur. We four kids sat wide-eyed with the windows open, letting the country wind whip our hair, as my father gripped the wheel grinning. I imagined him as a kid just then, fresh from high school and taking his ’32 Ford for a ride on the country lanes. Except that he was driving the family station wagon, and his wife and kids were starving.
 Amish horse and buggy. Photo by Matthew Trump There was a little bit of magic around the next bend. An Amish buggy, opened at the back, was tucked into a tangle of brambles and weeds. A sign by its wooden wheel read: Bread $1.
A tall man wearing black trousers with suspenders and a blousy white shirt greeted us solemnly as we scrambled out of the car. His long face was held up by a gray beard that smothered the space where his neck should be. He adjusted his straw hat as he looked at the sky. His horse stood by placidly, nuzzling a burlap bag.
“Last two loaves,” the man said. “You can have them for a dollar fifty. Best bread around,” he added, and he didn’t say anything more. He reached into the dark recesses of the wooden wagon and held out two mushroom-topped loaves of bread for our inspection. Did I mention that my father loves a good deal?
All these years later, I don’t remember much about the man, his horse or his buggy, except that his world seemed so unlike my own. But I do remember his bread. Fresh and flavorful, with a hint of butter and a background of yeastiness. It was plain, honest bread just like the Amish who baked it. We tore it off in hunks and ate it dry, spilling crumbs recklessly on the back seat of that station wagon.
Now to get some of that bread you could take a drive out along the country roads that stretch from Lancaster east to Philadelphia – my father’s old stomping grounds – and hope to stumble upon an Amish family who has been baking bread that morning. Or you can bake this bread in the comfort of your own home, using honest ingredients and a little bit of patience. Either way, it’s good sometimes to be reminded: the simple things in life are often the best!
Amish Country White Bread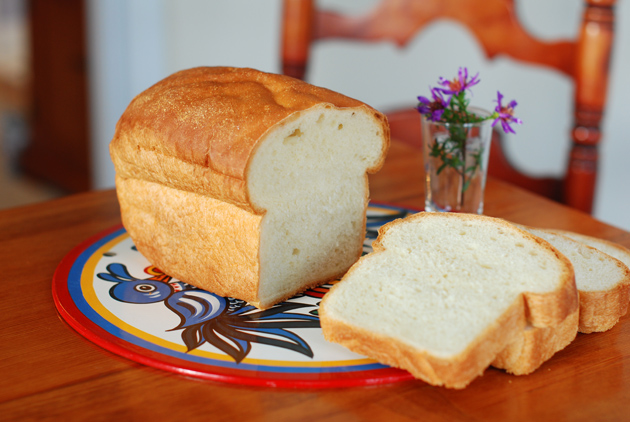
Makes two 22-ounce loaves
1 ¼ cups of milk, scalded and cooled
3 Tablespoons of butter
¾ cup of water at 105°
2 ¼ teaspoons of active dry yeast
3 Tablespoons of sugar
1 teaspoon of salt
4 ½ cups of unbleached bread flour (See note)
+ ½ cup of flour for benchwork and 1 Tablespoon of butter for the bread molds
A note on flour types: To achieve a high rise with a strong crumb, this bread is best baked with flour that has at least 11% protein content. Bob’s Red Mill, King Arthur’s, Pendleton Morbread or any flour that’s labeled ‘best for bread’ are all great here. If you’re not sure, check the nutritional content; any unbleached white flour that has 4 grams of protein per quarter cup will do.
Scald the milk: In a 1 quart saucepan heat 1¼ cups of milk over medium heat for 4 minutes. Once the milk is hot and steaming, remove it from the heat and add 3 Tablespoons of butter cut into three or four pieces. For best results, do not let the milk boil.
Make the dough: In a large bread bowl or the bowl of a stand mixer, mix together 2 ¼ teaspoons of active dry yeast (1 packet) and ¾ cups water at 105°. Whisk until frothy and let sit for a few minutes while the milk and butter mixture cools.
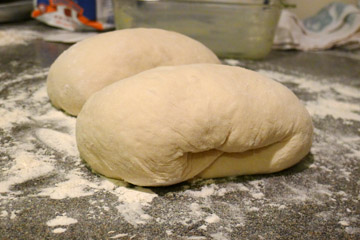 Dough ready for final shaping Add 2 cups of the flour, the sugar, salt and cooled milk mixture to the bowl and beat until smooth. With a stand mixer, this will take 2 minutes with the flat beater. By hand, it will mean 200 strokes with the handle of a wooden spoon.
Now gradually add 2½ cups more of flour, scraping down the sides of the bowl as necessary, until the dough is a smooth mass. If using a stand mixer, switch to the dough hook and mix on low speed for 2 minutes once the dough has formed a ball.
Kneading and first rise: Turn the dough ball out onto a lightly floured counter and knead vigorously for 5 minutes. Return the dough to the bowl, cover and let rise in a warm place for 2 hours, until doubled in bulk.
Second rise: Punch down the dough, pull the edges over as best you can to form a ball and let rise a second time for an hour.
Shape the loaves: Butter two loaf pans on the sides and bottoms. Turn the partly risen dough out onto the counter again, and lightly push the air out of the dough. Divide into two pieces. Roll each piece into the approximate shape of a loaf and let sit for 10 minutes. Now roll each piece lengthwise, again into the shape of a loaf, carefully stretching the dough. This will give the bread its high-rising structure.
Spray the loaves with a light mist of water and let them rise for 50 minutes to an hour in a warm place until their heads are popping out of the loaf pans.
Bake the loaves: Preheat oven to 400°. Bake loaves for 10 minutes, and then lower the oven temperature to 350°. Bake for a further 40 minutes until brown. Put a small piece of tin foil on top of each loaf if the top gets too dark.
Let cool on racks for 30 minutes before digging in. Enjoy!
 A Pennsylvania Dutch hex sign here at Chez Bullhog
At the gorge in George, the road heads north through miles of dry landscape: dark rock trimmed with sagebrush and sparse grasses. West of Quincy, however, is a completely different story. Here the land is sunglinted green in a wide swath that follows the glistening Columbia as far as the eye can see. Closer in the green becomes leaves, swaying lightly in the breeze. Among the leaves are apples. Hundreds and thousands of apples.
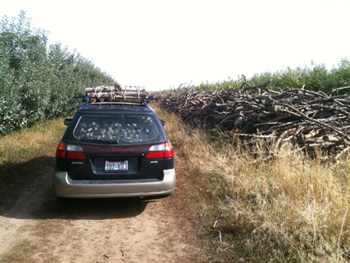 Stacks of apple wood. Absolute heaven for a woodfired guy! I found myself between two mature orchards, standing in a clearing in which stack after stack of apple wood marched into the distance. There was enough wood for my fire for a hundred years. I salivated at the sight. I breathed in its sweet flavor as I began packing my trusty wagon to the gills.
Mike came zipping up to me on his yellow ATV, one knee down on the seat like you’d ride a skidoo, and instantly started talking apples. On his hundred acres –long blocks of beautiful, sturdy trees in lines that rolled over the gentle hills– he was already picking Pink Lady, Gala, Honeycrisp, Braeburn. The newest buzz in cultivar circles at the moment was the SweeTango, so up-to-date that it had its own Facebook page and Twitter feed.
How cool is that? He’s looking into that one.
Driving the long journey back over the pass, I began to see the world through Mike’s eyes. To him, it was all part of the same cycle; when an apple variety stops selling, you replace the trees. New apple varieties show up in the grocery store once the new trees mature and meanwhile the woodfired guys get the wood from the old trees. Sounds like a handy arrangement to me.
Mike’s apples are in the stores now, all fresh and bursting with flavor. We’ve been trying them out for weeks and I can tell you this: when it comes to apples, variety really does matter. Just now at Chez Bullhog, Jonagold is our choice for making the best apple butter, and we reach for slices of Honeycrisp when we want a sweet snack. Our favorite go-to apple, however, is the Fuji. They’re crisp and flavorful, and they make the best pies, hands down: just ask my wife’s book club.
Now next year, it might be a different story. Maybe SweeTango, the new kid on the block, will win us over. Stay tuned!
Finest Fuji Apple Pie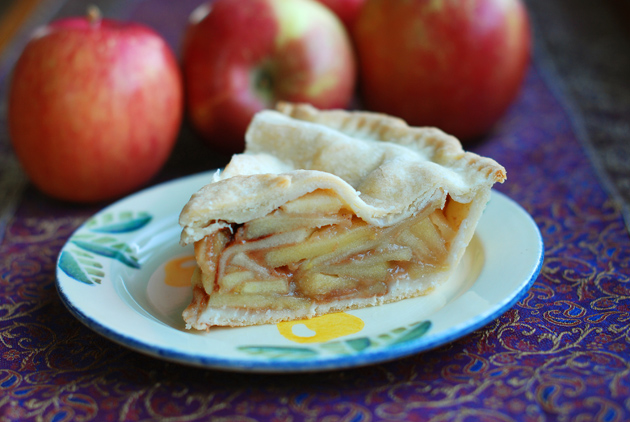
Makes one 9” pie
5 fresh Fuji apples
1 Tablespoon of lemon juice in a quart of water (optional)
1 cup of sugar
1/3 cup of flour
1 teaspoon of ground cinnamon
½ teaspoon of ground cloves
1 Tablespoon of butter
Pastry for crust (see below)
Prepare the apples: Peel, core and slice 5 Fuji apples into pieces 1/8 inch thick. To keep the apple slices from turning brown, do the apples one at a time and drop the slices directly into a bowl of water suffused with 1 Tablespoon of lemon juice. Set aside while you make the pastry.
Make the Pastry: In a large bowl, mix 2 cups of flour with ½ teaspoon of salt. Add 1/3 cup of shortening (we use Spectrum, which is non-hydrogenated) and 1/3 cup of butter. Cut in the fats with two knives or a pastry cutter until no piece is larger than a pea. Mix in 5 Tablespoons of cold water. Roll half of the pastry out on a floured surface until it is larger than the pie dish, and then carefully set it into place. Trim the edges.
Fill the pie: Drain the apples well. In a separate bowl, mix the 1/3 cup flour, 1 cup of sugar, 1 teaspoon of cinnamon and ½ teaspoon of clove together and then toss in the drained apple slices. Slip the coated apple slices out into the pastry lined pie dish and settle them in to fit as tightly together as possible. Leaving a hump in the middle. The apples at the edges should be up to and slightly below the rim. Pour any remaining sugary mix from the bowl on top and dot with a few pieces of butter.
Top the pie: Roll out the other piece of dough, again slightly larger than the pie dish. Wet the edge of the bottom pie crust with a little water and then put the top in place. Cut off the excess and seal the edge with a fork, making a pattern if you wish. The edge should be tightly sealed. Using a small knife, cut 3 or 4 slits in the top of the pastry.
Bake the pie: Preheat oven to 425°. Bake for 50 minutes on the center rack until the juices begin to bubble out of the slits. To prevent excess browning on the crust, put a thin strip of foil around the edge for the first 25 minutes.
Let cool for an hour before serving. Enjoy!
For more information on apple varieties, see the Washington State Apple Commission’s website Here.

Here’s a tasty way to cook pork chops on the falling heat of your woodfired oven. Layers of pork and tangy tomatillos simmer for hours in sweet apple cider until the meat is fork-tender. Served with rice, beans and tortillas, it’s a casual meal that transcends delectable.
This is a great “day after” recipe to make on the second day after baking bread or pizza. A casserole, Dutch oven or Italian bean pot with a tight-fitting lid is essential in trapping the flavors while allowing an aura of smoke to penetrate.
Braised Pork Chops with Tomatillos and Apple Cider 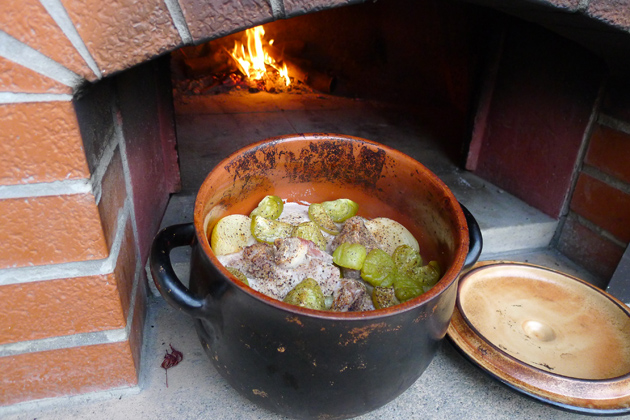
Makes 8 to 10 servings, takes 4 to 6 hours
3½ pounds of pork chops
10 large tomatillos, about 1 pound
1 medium onion, peeled and quartered
3 large carrots
8 ounces of apple cider
1 teaspoon salt
½ teaspoon freshly ground black pepper
Get the oven ready: Assuming your woodfired oven was thoroughly heated the day before, make a small fire with two handfuls of kindling and 4 sticks of hardwood that are 2 inches thick. Push the fire to the back and let it flame for 45 minutes, adding another stick or two near the end of that time. Sweep the floor clean of ashes.
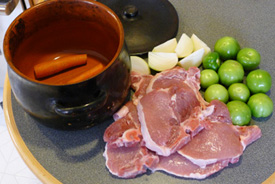 Assemble the casserole: Top and tail the carrots and put them in the bottom of your pot. Peel the papery covering from the tomatillos and quarter them. Peel the onion and quarter it. Put a layer of pork chops on the carrots and sprinkle them with salt and pepper. Put on half of the tomatillos and onion. Set down a second layer of pork chops, salt and pepper them and put on the rest of the tomatillos and onion. Pour the cider over the chops. Assemble the casserole: Top and tail the carrots and put them in the bottom of your pot. Peel the papery covering from the tomatillos and quarter them. Peel the onion and quarter it. Put a layer of pork chops on the carrots and sprinkle them with salt and pepper. Put on half of the tomatillos and onion. Set down a second layer of pork chops, salt and pepper them and put on the rest of the tomatillos and onion. Pour the cider over the chops.
Bake the casserole: Set the pot with the lid in place into the oven about a foot from the bed of coals and close the door. Turn the pot around after one hour. An hour later, turn the pork chops all the way over and cook for a further 2 hours.
As the heat of the oven is constantly falling, you can leave the casserole in for several more hours if you like so that the pork continues to cook. Add a little more cider at this point if the top bits of pork are fully exposed (a little popping out is okay).
For cooking in a conventional oven: Bake in a 325° oven for the first 1½ hours. Lower the temperature to 275° and continue cooking for a further 2 to 2½ hours.
Remove to a platter and serve with rice, beans and hot tortillas. Can you say ‘yum’?

My friend Rick looked at me funny when I announced that my bread needed some attention. We were after all waist deep in alpine fir branches on the slope below the cabin, cutting 50-pound rounds from trees we’d felled the day before. I was cutting. He was doing the heavy lifting. The sharp smell of sap rose fragrantly in the forest while Stellar’s Jays cackled high above us.
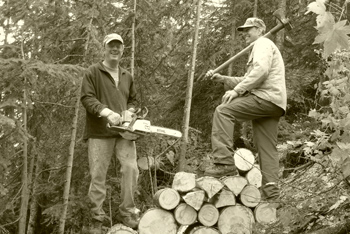 Intrepid woodsmen spotted in the forest near Steven's Pass Just now at the cabin it’s all about wood. With winter coming fast and certainly, we’re packing it in as fast as we can: apple wood from Eastern Washington, seasoned and ready to give us a good strong heat (sledded down the hallway, if you can believe that!); alpine fir for its availability and for that great pine smell. Wood from those trees we selectively cut will last us for years to come.
I set my chain saw down on the roots of a huckleberry bush – the only flat place around – and pulled myself out of the wood debris and up the hill. I gingerly took off my sap-coated gloves, shook the wood chips from my sap-encrusted jeans, and snapped my shirt to release chunks of saw dust that had gotten down the front. I kicked off my muddy shoes in the basement wood room and mounted the skinny stairs in stocking feet.
Lovely heat tinged with sweet smoke enveloped me at cabin level. The light was noticeably brighter now without the big trees that had threatened the deck. The birds had already adapted, dive-bombing each other to get at the best seeds that lined the rail. On the funky yellow counter, I formed loaves from plump dough flecked with green rosemary bits, set quarry tiles into the 1970’s oven and took a minute to gaze on the bright autumn colors wreathing Lichtenburg Mountain. Then, while the bread went through its final rise, I suited up for more backbreaking work.
On Monday, at 3600 feet, it snowed all afternoon. The snow didn’t stick, but it was just the impetus I needed. The next day, I worked in hazy sunshine to split and stack the last of the nearly frozen rounds. The heave of my maul and its sharp tock against the wood sent chipmunks scurrying for cover. And then, with the wood tucked away out of the elements for the winter, I put up my feet and revved up the fire. While flames danced above a pile of apple wood, I swiveled the chair to take a look at evening closing in on the mountain’s resting hulk. The hard work was behind me now; a feeling of satisfaction overtook me. I sliced Double Gloucester to go with hunks of fresh rosemary bread and sighed happily as I sat back with my book.
Winter? Oh, yeah. Bring it on!
Woodchopper Rosemary Bread 
Takes 20 hours. Makes two 28 ounce loaves.
On the evening of the first day, mix together in a large bowl:
3½ cups bread flour
½ teaspoon dry yeast
2¾ cups of water at 105°
2½ Tablespoons of finely chopped fresh rosemary
Cover and let ferment overnight in a cool place. In the morning, mix in:
2 cups of all-purpose flour
¼ teaspoon of dry yeast
2 teaspoons of salt
Sprinkle 1½ cups of flour on a work surface, and turn the dough out onto it, scraping as best you can. Clean and dry the bowl. Knead your dough well for at least 5 to 7 minutes, until it’s soft and stretchy. Put the dough back into the clean bowl, cover and let rise for 3 hours or longer.
Punch down, turn and let rise in a warm place for a further 1½ to 2 hours.
Shape into 2 loaves, stretching the outer skin smooth and tucking it under to make a ball . Put into baskets lined with well-floured cloth napkins, and let proof for a further 45 minutes.
Wet the top of the loaves, score with a sharp knife and sprinkle on coarse salt. Bake in a preheated 425° oven on quarry tiles or a pizza stone for 50 minutes.
Let cool before slicing and digging in. This bread goes great with cheese and/or soup in front of a roaring fire. Enjoy!
 The last rounds. What a great place to have to work!
A gaggle of women in brightly colored saris choose snacks from shelves behind a long counter, their dark eyes widening as bags of goodies change hands. I watch the gulab jamon man to one side pouring a thin ribbon of saffron-yellow batter onto hot oil. He works his funnel quickly, creating a pattern of looping swirls the length of the wide cauldron. The sweet smell of sticky honey hangs in the air. As he deftly flips the puffed dough with a wire implement he chatters in Punjabi to a man standing next to him. Families in freshly laundered clothes crowd the sweet shop’s doorway, jostling for position.
 Manchester's Curry Mile at night. Photo by Pete Morris At a café nearby tables sporting hookahs spilled out onto the dingy sidewalk. Around each table sits a group of young people smoking shaggy bricks the size of sugar cubes which nestle in glowing brass bowls. Snaking ropes connect the mouths of the partakers who let out dribbles of smoke from around their mouthpieces and lean back against spongy cushions with broad Cheshire cat smiles.
‘Shisha,’ our friend’s son tells me with a glint of his 16-year-old eyes. ‘Comes in all sorts of flavors: blackcurrant, mango, coffee. That’s what I want to try,’ he said in his strong accent and then – looking at his mother as if having said too much – he darts off down the street.
You might be forgiven for thinking that we Bullhogs were on a street in, say, Mumbai or New Delhi. But this all took place in Manchester, in northern England. If it wasn’t the best Indian food experience we had on that trip (that honor would go to Kayal in Leicester), Manchester’s Curry Mile was certainly the most entertaining. With some 70 curry and kebab houses to choose from, this stretch of Wilmslow Road claims the highest concentration outside of the Indian subcontinent. On that warm summer’s evening the constant flow of the ethnically diverse population surely transported us.
At clean and spacious Shere Khan, my friend Roy’s face turned red as he began to sweat from the heat of his Madras curry. I got up to find him another napkin and was delayed by the sight of a large brazier to one side of the kitchen. At its massive rectangular grill, a tall man in a turban stood slathering a spice and yogurt mixture onto skewers of chicken and lamb. As the meat sputtered and popped fantastic smells rose on the sweet smoke. The man met my eye and gave me a knowing smile.
Back home in Seattle, I marinated chicken in yogurt and spices before cooking the skewers over a very hot fire, just the way that man did. The smells wafted up around me, smoky and spicy at the same time, and the resulting texture was sensational. And I decided that even though I was far from India – and even far from the Curry Mile – I was close to Nirvana. Yum! Here’s what to do.
Tandoori Chicken Skewers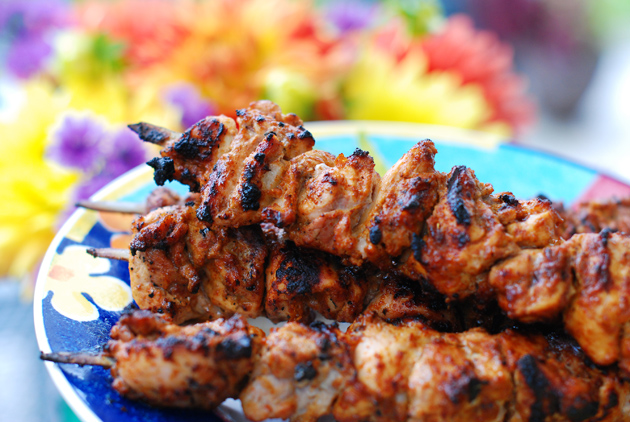
Makes 4 large skewers
2 pounds of boneless skinless chicken thighs
8 ounces of plain yogurt
¼ cup of dry Tandoori spice (see note)
¾ teaspoon of salt
Black pepper to taste
2 teaspoons of canola oil
4 long metal skewers
Tandoori spice note: World Spice Market here in Seattle sells a fresh curry mixture called Tandoori Spice, which is what I use. In place of red food coloring, their mixture uses mild paprika. You can mix your own Tandoori spice with mild curry powder and paprika in equal portions, and add a bit of cayenne if you want more heat.
 Chicken pieces in the yogurt marinade Marinate the chicken for 4 hours: Trim any fat from the chicken thighs and cut each one into 3 or 4 pieces. Set aside one heaping tablespoon of the spice mixture for later. Mix the yogurt and the rest of the tandoori spice in a medium-sized bowl. Put the chicken into the yogurt mix and fold so that all the pieces are well coated. Cover with plastic wrap and let marinate for 4 hours or longer.
Get the grill HOT: A charcoal grill is best for this dish. Mine is a little Smokey Joe from Weber, which puts the grill surface about an inch and a half from the coals. Perfect! Light 40 coals and let the pile burn for 20 minutes. Spread the hot coals out, add 10 fresh coals and put the grill surface in place. Ten minutes later you’ll be ready to rock and roll.
Thread the skewers: Distribute the chicken evenly onto 4 metal skewers and spread any yogurt mixture that stays in the bowl onto the meat. Sprinkle the top side of the meat with half the leftover Tandoori spice and salt and pepper generously. Drizzle 1 teaspoon of the oil onto the meat as well.
Grill the meat: Scrape the surface of the grill clean if necessary and wipe with a bit of oil, if desired. Put the meat top side down onto the hot grill. Now sprinkle the meat with the rest of the Tandoori spice and more salt, pepper and oil. If the charcoal flames a bit, ignore it.
Grill the skewers for 2 minutes before turning. If the meat wants to stick, use a metal spatula or tongs to free it. Grill the other side for 2 or 3 minutes and then turn the meat ¼ turn to grill the undercooked sides for a minute or two.
Depending on the heat of your grill, the chicken will be cooked thoroughly in 8-10 minutes. For best results, shift the positions of the skewers to alleviate any hot or cold spots on the grill. Whatever you do, resist any temptation to put the lid over the grill. The chicken will grill perfectly without it.
Cheers!

I’d love to tell you that the tomatoes here at Chez Bullhog were wonderful this year, but it just ain’t so. For a true tomato connoisseur, this is one tough admission.
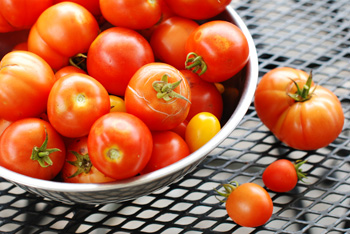 Homegrown tomatoes here at Chez Bullhog Oh, we put the plants in the sunniest spot in the garden and by turns coddled and abused them at just the right times. We thinned the unproductive shoots and trimmed half the leaves the way we do in the Northwest to get the best crop. But while they looked pretty good on the vines, all those red tomatoes never matured all the way to the center.
(I suspect it has something to do with that old nighttime temperature, which throughout our Seattle summer hovered just above 50 degrees. The poor little darlings got cold at night!)
When I had the woodfired oven revved up for pizza the other day, I roasted a bunch of these tomatoes to see what would happen. With the backdrop of a good pile of coals and lots of active flame, it really worked a treat. The tomatoes softened nicely and took on a marvelous flavor tinged with garlic, olive oil and apple wood smoke. And man, are they sweet!
Now while I realize not everyone has a woodfired oven to make these in, you can use your conventional oven to get similar results. Get your oven as hot as it will go, follow the steps below and finish the tomatoes for a minute or two under the broiler. Roasted tomatoes are great over pasta, spread on pizza or turned into a dip for fresh bread. Yum!
Fire Roasted Tomatoes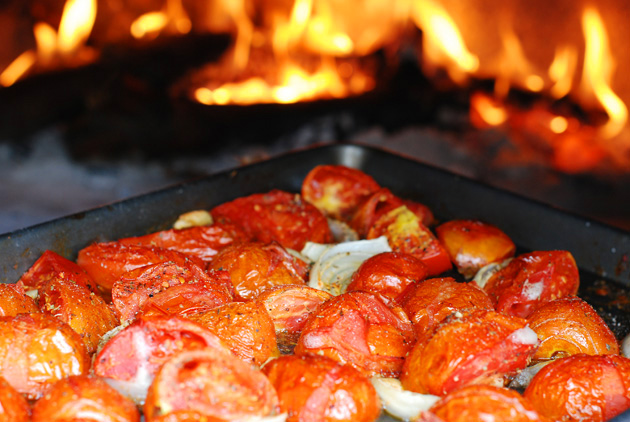
3 pounds of red tomatoes (slightly underripe is okay)
¼ of a medium onion
2 large cloves of garlic
3 Tablespoons of olive oil
½ teaspoon of oregano
Salt and pepper to taste
- Cut small tomatoes in half, medium ones into quarters and large ones into 6 or 8 pieces. Slice onion into strips. Break or cut garlic cloves into chunks.
- Spread 2 Tablespoons of olive oil onto a heavy cookie sheet or jelly roll pan. Distribute tomatoes, onion and garlic chunks evenly in one layer. Drizzle with more oil and sprinkle on the oregano, salt and pepper.
- Roast for 15 minutes in a flaming hot pizza oven or 20 minutes in a 475° conventional oven, turning tomatoes over and pan around halfway through to ensure even cooking. Finish for a minute or two under the broiler, if desired.
To make Roasted Tomato Dip: In a food processor, combine a crumbled slice of good day-old bread with a large clove of crushed garlic. Add 1 cup of roasted tomatoes, some grated parmesan and just enough of the roasted tomato juice to make a smooth paste. Serve warm or cold with hunks of fresh bread.

At Brighton the bus turned west and set off onto a wide sweep of headland. Here and there white chalk cut into fields and stood starkly against the green shrubs and close-cropped grasses that filled our view. At Southampton a low swath of land dropped to reveal the Solent and the sea beyond. As I gazed upon yellow September light that tinged the Isle of Wight in the distance, my heart was in my mouth. All that I’d imagined about England – villages, hedgerows, even the occasional thatched cottage – was around me. This was different. This was real.
 Mullion Cove with Penzance in the distance We skirted the strangely named New Forest, long devoid of trees, and headed out toward Cornish coastal towns. At Falmouth, famous for assisting the British navy in blockading the French during the Napoleonic wars, we took a local bus farther south. Towns fell beneath the wheels: Mabe Burnthouse, Jobs Water, Trevenan Bal, Goonhilly Downs. We landed at Mullion Cove, tucked against the shore like some smuggler’s lair carved into the Lizard.
Inside a converted farm building we dropped our heavy packs beside the smoky fire. A beefy man in a worn green jacket propped open a window to let in the seabreeze, welcomed us with a few spare words and, tucking our pound notes into his pocket, went out smiling. The place wasn’t much to look at, but for our unimaginably tight budget it was more than ample: a few beds in a loft, a tiny kitchen and a cozy nook in which to put up our boot-tender feet. On a Cornish night that was blacker than black we fell asleep listening to the soft whinny of a nearby horse and seemingly in an instant low sunlight was streaming in again on the wattled walls.
Knuckling sleep from my eyes I negotiated the dewy lawn to arrive at what the farmer had called the ‘dairy’, a stone kitchen at the back of the farmhouse. Through its fogged windows I watched a woman jauntily clanking pot lids who gestured me in and pushed a mug of milky tea into my hands. On her face was a broad morning smile. She wiped her hands on her apron, pulled a warm plate from the oven and busied herself for a moment at the massive Aga. Then she put before me a plate heaped with unusual breakfast offerings: locally made sausages, slices of sautéed mushrooms and broiled tomatoes.
When I made this lovely pizza last week, it took me right back to that British B&B breakfast, the first I ever had. I can see my friends bustling into that warm stone kitchen to join me around the table, rubbing cold from their hands, grabbing at chairbacks. Steaming plates of food, set before them in a jiffy, made their eyes go wide. Could we make it all the way out to Penzance along the cliffs? How far was it? How good the trail? We fell to fortifying ourselves for adventure and – afterwards – patted our full bellies and went out to greet the brilliant English day.
British B&B Breakfast Pizza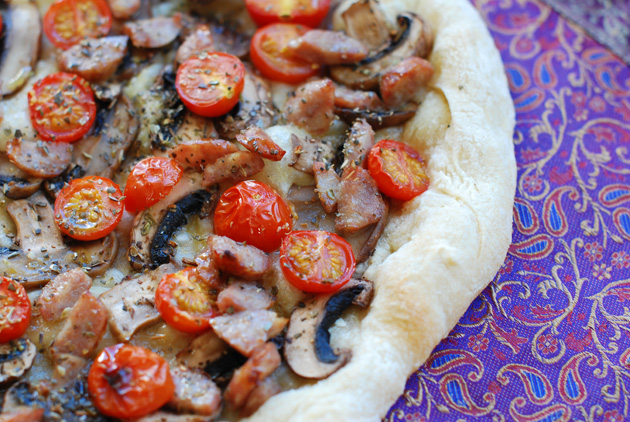
Makes a 12” pizza
12 ounces of pizza dough (click Here for our favorite)
3 ounces of cremini mushrooms
1 teaspoon each butter and oil
2-3 links of cooked breakfast sausage
20 cherry tomatoes, sliced into halves
2 ounces of shredded mozzarella
1 Tablespoon of good olive oil
Salt, pepper and oregano to taste
For woodfired pizza: Build a fire in the center of your oven. By the time the pizza goes in, the fire should be at least 2 hours old and the walls of the oven should be turning white. In the last 30 minutes, move the fire side to side to heat the floor tiles. Move the fire to the back and sweep the floor before putting in the pizza.
For baking in a conventional oven: Line the center rack of your oven with a pizza stone or quarry tiles and preheat for 30 minutes at 450º.
Prepare the ingredients: Slice the cremini mushroom and sauté for 5 minutes in the butter and oil. Cook the sausage according to package directions and cut the links into small pieces. Make a 12” dough blank for the pizza. (For more on making pizza dough, see Making Great Pizza Dough.)
Assemble the pizza: Put the dough blank onto a floured peel and make sure it can ‘slip’. Sprinkle half a tablespoon of olive oil and all of the mozzarella onto the dough blank. Distribute the mushroom slices and the sausage pieces on top of the cheese and then dot with cherry tomato halves. Sprinkle salt, pepper, a bit more oil and some oregano onto the pizza.
Bake the pizza: Slip the pizza directly onto the pizza stone or the floor of the woodfired oven. Depending on how hot your woodfired oven is, the pizza will take 4 to 7 minutes. In a conventional oven it will take 8 to 10 minutes. Turn the pizza around halfway through baking.
Now, put on a silly English accent and pour yourself a cup of tea. It’s a fine morning. Walkies, anyone?
 Trekking on the Lizard in southern Cornwall
At Chez Bullhog, we take pizza pretty darned seriously. In the lead-up to building our woodfired oven in 2004, the fervor stepped up a couple of notches. Sure, we can always work the toppings, but it’s the dough that has become most important. As any aficionado can tell you: every great pizza begins with a great crust.
In my quest for truly great pizza dough, I’ve scoured books and chatroom conversations looking for snippets of inspiration. Talked to pizza makers. Read interviews with formidable pizzaoli. On one glorious October morning several years ago, my wife had to drag me away from the window of Il Forno in Rome’s Campo dei Fiori, where I stood open-mouthed watching burly men form 10-foot slabs of white pizza from buckets of spongy dough.
Now while I don’t profess to have all the answers, the smiles that light the faces around the table these days are proof positive that I’m on the right track. Whether you use our recipe below or your own tried and true favorite, following these steps will put you on the path to similar results. Come on, let’s make pizza!
Another Fine Pizza in the Fire at Chez Bullhog
Ten Steps to Great Pizza Dough
1. Expect your dough to take a minimum of 5 hours. Believe me, I’ve tried to cut down the time, but so many aspects of the dough – from texture and bite to the strength of the dough – depend on a slow rise. If you really want to make pizza in less time, consider making pan pizza.
2. Create a 75-80° environment for proofing your dough. Put a clamp-on light and a thermometer inside a cabinet that has a shelf large enough to hold your bread bowl. Check the temperature hourly. If you want to get fancy, put a dimmer switch on the light to more accurately control the temperature.
3. Use a bit of Italian flour in the mix and don’t stint on the salt. I use a 50-50 mixture of Type 00 Caputo flour to all-purpose flour. This gives the dough enough stretchiness to make pizza blanks without compromising on strength. The salt enhances flavor and color.
4. Give the dough a rest before kneading. Once the flour, yeast, salt and water are mixed, you’ll do best to give the dough 10 or 20 minutes to relax. This gives the gluten in the flour some time to form and makes the dough less sticky and thereby easier to knead.
 Kneading the Pizza Dough 5. Knead your dough vigorously for at least 15 minutes. Turn your dough out onto a well-floured surface and get to work. Some Italian pizza makers insist you should knead pizza dough for 20 minutes, but I find that 15 minutes is ample. If you get tired, stop halfway through and come back to it.
6. Add oil to the bowl, not to the dough. Many pizza dough recipes call for oil in the mix. I find the dough to be puffier without it. Instead, I add the oil to the bowl and ‘marinate’ the dough in it.
7. Follow the 2½ – 1½ – 1 method. The first rise will take 2½ hours at 75-80°. The second will take 1½ hours. After that, let the dough rest for 1 hour before dividing the dough for individual pizzas.
8. Careful with those gluten strands, Eugene. Your dough should be half puffy when you cut it into individual pizza sizes. (Avoid the temptation to tuck the top over like a bun. This is the easiest way I’ve discovered to make a thin spot in the center.) Once you’ve arrived at this point, the dough can rest for an hour or two at room temperature. Lightly oil a deep baking pan or some quart-sized plastic tubs to hold the pieces until you’re ready to make pizzas.
9. Give your dough some final warmth before stretching. Flatten the dough pieces slightly and put them two at a time onto a lightly oiled cookie sheet. Pop them into the warming cupboard again for 10 minutes before shaping into full-sized pizzas. One Italian baker told me that his dough had to be 80° in order to make the best pizza. I believe him.
10. Make your oven as hot as possible. This is what the woodfired thing is all about. For that great dough to become a perfect pizza crust, it has to get hot very quickly. To replicate this in a conventional oven, use quarry tiles on the center rack and preheat them to at least 450° before slipping the pizzas directly onto them.
Bonus tip: Add a little day old dough if you have some. The addition of mature dough adds a new dimension to your pizza crust. You can refrigerate a piece of dough for up to 3 days and still achieve similar benefits.
Chez Bullhog’s Pizza Dough recipe:
Makes four 12” pizzas
2½ cups (13 oz.) unbleached all-purpose flour
2½ cups (13 oz.) type 00 caputo flour
1½ teaspoons of sea salt
1¼ teaspoons of dry yeast
2½ cups of water at 105°
10 ounces of yesterday’s dough (optional)
3 Tablespoons of good olive oil
1 cup of flour for bench work
In a large bowl, briskly mix all ingredients except for the oil and the benchwork flour with the handle of a wooden spoon. Follow the steps above, cleaning out the bowl before adding oil to it. After kneading, put the dough into the bowl and lightly cover with a cloth or piece of plastic wrap. Let rise according to the schedule, deflating and turning the dough before the next rise.
Divide into 12 ounce pieces, stretch out the dough into 12” rounds and top with your favorite toppings. Bake until the crust is lightly browned and the cheese is bubbly.
Enjoy!
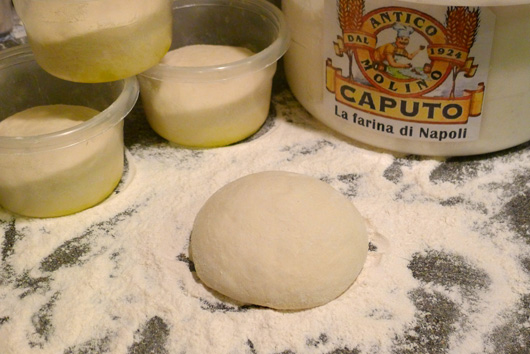 Finished Dough Balls ready to rock and roll!
|
A sample text widget
Etiam pulvinar consectetur dolor sed malesuada. Ut convallis
euismod dolor nec pretium. Nunc ut tristique massa.
Nam sodales mi vitae dolor ullamcorper et vulputate enim accumsan.
Morbi orci magna, tincidunt vitae molestie nec, molestie at mi. Nulla nulla lorem,
suscipit in posuere in, interdum non magna.
|
|


