One of the great joys of any visit to my brother-in-law’s flat near Lake Como in Lombardi, northern Italy, was a trip to the Bennet mega grocery store. Larger than a Coop, more homey than a Carrefour, Bennet offered miles of prosciutto and cheese, amazing displays of seafood and olives and fresh produce and wine. And Italians.
It was here I first saw the Italian style of grocery shopping: one cart for 8 people. Like flotillas, these families – brother, sister, mom, dad, Aunt Rosa, Uncle Pietro, grandma in black – plied rows of canned goods, inspecting, comparing and gesturing. As one group met another, their mingling caused massive traffic jams in the aisles, with enthusiastic kissing and hugging and laughing and saying ‘my, hasn’t little Giuseppe grown?’ as they all beamed at the youngest family member. What a way to shop!
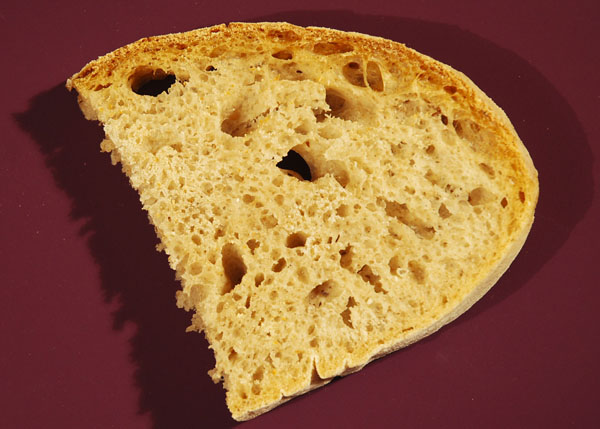
It was here that I also encountered true Italian bread for the first time. With a well-developed crust and a crumb that was bubbly and yet firm to the bite, it was offered in banks of large open baskets. The type I always chose was slightly blackened from its firing in brick ovens. Here is my rendition.
Lago di Como bread
Makes 2 loaves, 28 ounces each
3 cups water, 70º F
2½ cups all-purpose flour
½ cup rye flour
1 cup spelt flour
1 Tablespoon flax seed meal
2¼ teaspoons salt
1 teaspoon yeast
1½ cups all-purpose or bread flour
¾ cup flour for bench work
Two notes:
- This is a wet dough that requires a plastic bowl scraper in order to work it properly. If you don’t have one, you can cut a plastic lid in half and use that.
- For best results, let rise in a cool place (60º) overnight. If you really must have it in less time, use 2 teaspoons of yeast and let rise at room temperature.
Make the dough: Put first seven ingredients into the bowl of a 6-quart Kitchenaid mixer, insert the dough hook, and mix on mark 2 for 10 minutes to make a smooth batter. Add 1½ cups additional flour and continue mixing for a further 7 – 10 minutes, scraping the sides and bottom of the bowl twice to incorporate all the flour. Cover and let sit for 20 – 30 minutes before kneading. This dough can also be mixed by hand in a large bread bowl.
Knead the dough: Generously flour a work surface and pour the wet dough onto it, scraping clean the bowl. Using the plastic dough scraper, pull the 4 corners of the dough in to the center and let sit for a few minutes. Repeat. Working with as little flour as possible, knead the dough for 7 minutes, scraping the counter as necessary.
1st rise: Put dough into a clean bread bowl, cover with a dish towel and a piece of plastic wrap. Let rise for 6-8 hours or overnight.
2nd Rise: Use the scraper to pull the sides in from the bowl to deflate the dough. Let rise another 6-8 hours or overnight (this leeway depends on when you make the dough).
Shape and put into baskets: The loaves will need to rest in baskets for 1 hour and 45 minutes before baking, so when using a woodfired oven pay attention to the timing. Turn the dough out onto a floured work surface. Divide the dough into 2 equal parts (about 28 ounces each). Without pushing too hard, press the largest bubbles to the edge and release the air at the edges while keeping the rest of the dough springy. Tuck the edges under lightly to make mounded balls, and place these on floured cloth napkins in bread baskets. Sprinkle the tops with flour and bring the corners of the napkins over to meet loosely on top. Let rise for 1 hour and 45 minutes.
Baking in a woodfired oven: Your fire should be at least 1½ hours old, and 2 hours old in winter. Push the mature coals to the back center of the oven, near the wall, and brush the ashes off of the floor. There should be 6 to 8 fist-sized chunks of glowing hardwood coal and a good bed of embers, but little or no flame when the loaves go in.
Turn the loaves out onto floured peels. Shape lightly, tucking edges under without deflating the dough. Slash a design if desired. Slip each loaf into the oven to have a long side parallel to and 8 inches from the coals. Close the door.
After 20 minutes, turn loaves so the other side faces the fire.
After 20 minutes, turn loaves so one end faces the fire.
After 10 minutes, turn loaves so the other end faces the fire.
After 10 minutes, remove to cool.
Baking in a conventional oven: Heat quarry tiles on center rack at 400º for at least 30 minutes. Slip loaves directly onto the tiles. Bake for 20 minutes, lower heat to 375º, and turn loaves around. Bake for a further 35 minutes.
Let cool for 1 hour or more on a rack before digging in. Enjoy!


I seriously need to be related to your brother-in-law. Can that be arranged? The bread is mouth-watering and now I am craving it.
I love crusty breads. Dipped in garlicky olive and balsamic, yum! This look delicious!
Sorry Claudia, he gave up that flat and now lives in Lyon. Now we can’t visit Bennet anymore, and are reduced to visiting the land of Paul Bocuse, Carrefour and crepes galore. Just kidding of course. It’s really no hardship on our part!
Looks splendid! Will you show me how to make it when you visit???
Yet again, you show me a recipe that *proves* we need to build an oven in our backyard! This is a fantastic looking bread.
I with Jenny, I need a brick oven in the backyard….for pizza and bread. This looks wonderful!
This como bread looks great…
Harika gıdalar.Herşey çok güzel…
http://cahideninelleri.blogspot.com/
Oh wow. This looks like such a great bread to go with anything. Especially the soup I am eating right now!
Now that I’m on this massive bread-making-kick, I am going to have to add this to my list of things to try to make!
The bread is a gorgeous color.
that looks FAB! I love crusty breads:)
Hehe that’s so funny the way you described the flotilla of shoppers clinging to a single trolley. Sounds like everyone socialises and shops at the same time! 🙂
Oh! This bread looks delicious, I love when the bread has “big” holes 🙂
Wow, this bread looks truly amazing! I would love to try it!
I live in Denver. Would I change anything in this recipe?
I would like to give this lovely bread a try in my wfo pizza oven. May I ask is this the orginal recipe used from the store where you saw this bread or where did was the original recipe acquired?
Woodfired greetings.
All recipes on this site are my own. As long as you’re using them for home use, I’m happy to share.
Let me know how your bread turns out!
I’ve just gotten into baking bread and I absolutely love it! This looks like a must try! I love rustic, wet dough breads—they remind me of the breads I grew up on, so hard to find these days.
[…] cup flour for bench work […]
Pretty nice post. I just stumbled upon your weblog and wished to mention that I have really enjoyed browsing your blog posts. In any case I’ll be subscribing for your rss feed and I am hoping you write again soon!